
I know I’m really late to the party, but I’m just finally creating something from scratch in Ruby on Rails. I’ve dealt a tiny bit with Rails before, but it was mostly just in helping my brother with CSS stuff, which obviously isn’t working on the Rails backend.
Anyway, now that I’ve started working with Rails (to build a simple app for my wife), I’ve found myself needing to learn how to do things in Rails 5. The problem is, a lot of things have changed in Rails, but most Google search results for ‘Rails …’ or ‘Ruby on Rails …’ end up with articles that are at least several years old. It’s hard to figure out what actually applies to Rails 5, vs. any other version of Rails. Thus, I’ve decided to write up some of my findings so that they’re hopefully helpful for someone else.
I’ll assume that you already know how to create your initial models, views, and controllers. If you don’t, check out this guide to get started.
Creating Many:Many Associations
Creating links between your records is pretty straightforward. I’m going to be using hypothetical ‘products’ and ‘purchases’ tables, which aren’t necessarily a perfect use-case for this, but they’re good enough. We can use Rails’s simple generator to make a link between our tables:
rails generate migration CreateJoinTableProductsPurchasesAll that’s going to do is generate a migration file (if you want those indexes, uncomment the two t.index lines):
class CreateJoinTableProductsPurchases < ActiveRecord::Migration[5.2]
  def change
    create_join_table :products, :purchases do |t|
      # t.index [:product_id, :purchase_id]
      # t.index [:purchase_id, :product_id]
    end
  end
end
After updating our database with the migration (rails db:migrate), we just need to add a has_and_belongs_to_many to each of our models:
class Product < ApplicationRecord
    has_and_belongs_to_many :purchases
end
class Purchase < ApplicationRecord
has_and_belongs_to_many :product
endI know that using has_and_belongs_to_many may be going out of favor, but I haven’t had time to look at the alternative just yet, so I’m sticking with HABTM for now.
Creating Many:Many Links in the UI
Now you’ve got a link between your two models, but no convenient way to create any links! That’s what we’ll be focusing on next. Luckily, it’s pretty easy, you just need to know what to do.
Showing Many:Many Forms
First off, in the form for the ‘products’ side of our relationship, we’ll simply add the following:
<%= form.label :products %>
<%= collection_select(:purchase, :product_ids, Product.all, :id, :name, {}, { :multiple => true } )%>
If you’re using Rails’s scaffold generator, you’ll add it to app/views/<model_name>/_form.html.erb. This creates a list of all the ‘products’ (in the example code) in the form for a purchase, and allows you to select multiple products.
If you’d like, you can add similar code to the other side of your relationship. In my case, I’m just adding it on one side. The form will end up looking something like this:
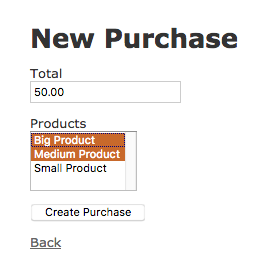
You can use ‘Ctrl/Cmd+click’ to select more than one item in the list, but that’s really all there is to it. It’s a very basic form, but it’ll do the trick.
Of course, you can do something more advanced, but we’re just covering the basics here. Ideally, I’d like a multi-select autocompleting textbox. Hopefully some day in the near future I’ll be able to put a guide up here on how to do that.
Saving Many:Many Relationships
Now, to make our selections actually save, we’ve got to add something to the controller. Since I’m only allowing the creation of links from the ‘Purchase’ UI, I put this code in my app/controllers/purchases_controller.rb file, in both the create and the update methods:
params[:purchase][:product_ids].each do |product_id|
  unless product_id.empty?
  product = Product.find(product_id)
    @boarding.products << product
  end
end
And that’s all there is to it! When you either create or update a ‘purchase’, your selection for its ‘products’ will be saved.
Viewing Many:Many Links in the UI
So now that we’re able to easily create links, it would be nice if we could view those links. So let’s make it possible to see the list of ‘products’ in a ‘purchase’. Using the Rails scaffolding, we’re going to want to expose these in both the ‘list’ view and the ‘single’ view for each side of our link. You can pick if the same applies to you.
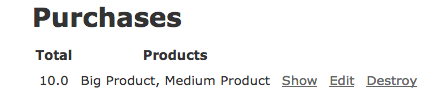
In our app/views/purchases/index.html.erb, we’re going to add the following to a new <td> that will display the ‘products’ in each ‘purchase’. Don’t forget to add an associated <th> in the header, as well.
<%= purchase.products.map(&:name).join(', ') %>Then, upon loading /purchases, you’ll see something a lot like this:
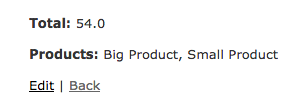
Next up, we need to add some very similar code to our app/views/purchases/show.html.erb file (but note the @ in the name of the purchase variable:
<%= @purchase.products.map(&:name).join(', ') %>And then you’ll have something like this when you view your ‘purchase’ (at a URL like /purchases/2):
Conclusion
That’s it! As I said, this isn’t a perfect use-case for a many:many relationship, but it’s at least an overview of how to create the UI elements that will allow you to save and view such relationships.
If you want to take a look at the code in its entirety, it’s available on GitHub. And, if you’ve got any tips or comments, drop them in the ‘comments’ section below! That’s what it’s there for!
Leave a Reply to Paul Cancel reply