
There are some cool things about running your own DNS server. I use it to reference some web services that I run internally more easily, like my Unifi Controller, PiAware, and my home-grown Linux Server. It’s a lot easier than trying to keep track of the IP addresses of everything in your network.
For that reason, I’ve been running my own DNS server for awhile now. For awhile, I was just running my own BIND instance. Unfortunately, probably because I’m just not familiar with it, it wasn’t very stable. Luckily, something even better came along: Pi-Hole.
What’s Pi-Hole?
Pi-Hole is a stable, free, and lightweight DNS server with built-in adblocking abilities. The coolest part is that it blocks ads across your network (assuming you tell all your devices to use it as their DNS server), even devices that don’t support things like adblocking extensions. In my case, it’s the perfect solution.
My Old Approach
For awhile, I’ve been running Pi-Hole in Docker on my Linux server. To keep my DNS encrypted (because really, who wants to expose all their DNS requests to their ISP?), I’ve been routing queries over a VPN. The problem with this is that if, for some reason, my VPN connection fails, my DNS stops, which means all my devices think they’re not connected to the Internet. Obviously, that’s not ideal.
One other bit is that (probably through my own stupidity) my Docker container running Pi-Hole doesn’t automatically start up when I reboot the server. This has been a bother sometimes, even if it’s not something really serious. So I’ve decided to switch things up & figure out a way to make it more robust.
Pi-Hole on a Raspberry Pi
I’ve decided to start running Pi-Hole on a machine dedicated to the task. Since it’s designed for a Raspberry Pi, and I had an extra one (or two…) lying around, this seemed like a good way to go.
So I downloaded Raspbian, flashed it onto a Micro SD card, and touched a new file called ssh to enable SSH access without having to plug in a mouse, keyboard, and monitor. Then I went to my router’s control panel to find the IP address of the Raspberry Pi so I could ssh in. Raspbian boots up with username pi and password raspberry – log in & change your password before continuing (ssh pi@<IP ADDRESS> and then passwd pi to change it).
Finally, after changing the password, I ran through the Pi-Hole installation guide to get Pi-Hole itself set up. It’s about as simple and straightforward as it gets, honestly.
When you finish the installation, make sure you take note of the web admin password that it outputs – you’ll need it later. If you don’t, you’ll be able to reset it from the command line when you need it).
DNS over HTTPS
To encrypt our DNS queries outside the network, we’re gonna make Pi-Hole use cloudflared‘s DNS proxy feature. The nice thing about this is that this service will only handle DNS traffic, and since the Raspberry Pi is only running cloudflared and Pi-Hole, there’s a lot less risk of things interfering with it than on my server. Plus, running both Pi-Hole and cloudflared as services mean they start automatically and can automatically restart if they fail.
Installing cloudflared is pretty simple, since it’s a Golang binary. For a Raspberry Pi, download the ARM package from the Cloudflare Developers site. Assuming you’re using the command line, use these steps to download, extract, and move it into place:
wget https://bin.equinox.io/c/VdrWdbjqyF/cloudflared-stable-linux-arm.tgz
tar xzvf cloudflared-stable-linux-arm.tgz
sudo chmod +x ./cloudflared
sudo mv ./cloudflared /usr/local/bin
Then, to verify it’s working, run cloudflared -v – it should output the version (as of now, it’s 2019.12.0).
Run cloudflared as a Service
Next up, we need to set up cloudflared‘s proxy-dns command as a service. First up, create a new user to run the service:
sudo useradd -Mr -s /bin/nologin cloudflaredThen, change the permissions on the executable so that it’s owned by our new user:
sudo chown cloudflared:cloudflared /usr/local/bin/cloudflaredTo actually make the service, we put the following into /etc/systemd/system/cloudflared.service:
[Unit]
Description=cloudflared DNS Proxy
After=syslog.target network-online.target

[Service]
Type=simple
User=cloudflared
ExecStart=/usr/local/bin/cloudflared proxy-dns --port=5053 --upstream https://1.1.1.1/dns-query --upstream https://1.0.0.1/dns-query
Restart=on-failure
RestartSec=5
KillMode=process

[Install]
WantedBy=multi-user.target
This will tell systemd how to run our service – we’re pointing it to Cloudflare’s https endpoints for DNS and telling it to listen on port 5053. It’ll restart automatically if it fails, and it won’t start up until after the network is online. Now we can start it up:
sudo systemctl enable cloudflared
sudo systemctl start cloudflared
If you run sudo systemctl status cloudflared, it should now show you active (running) in the output. To test that it’s working properly, run nslookup -port=5053 google.com 127.0.0.1 (from your Raspberry Pi). You should see something like this as output:
Server:         127.0.0.1
Address:        127.0.0.1#5053

Non-authoritative answer:
Name:   google.com
Address: 172.217.14.206
Name:   google.com
Address: 2607:f8b0:400a:803::200e
With this command, we’re telling nslookup to point to localhost on port 5053, which is where we’re running our cloudflared proxy. If you get an error, you’ll have to troubleshoot it.
Point Pi-Hole to Cloudflared
The last thing we need to do is tell Pi-Hole to use our cloudflared proxy as its DNS server so that all its DNS requests are encrypted by HTTPS. Access your Pi-Hole’s web interface by entering its IP address in your browser. Click ‘login’ on the left and enter the password that Pi-Hole output when you first installed it. If you lost the password (or didn’t write it down), you can reset it by entering pihole -a -p '<PASSWORD>' in the SSH console of your Raspberry Pi.
Then click ‘Settings’ in the left panel, then ‘DNS’ in the tabs at the top after that. In the resulting settings panel, uncheck all the boxes on the left-hand side, and enter 127.0.0.1#5053 in the ‘Custom 1 (IPv4)’ box on the right. Make sure you check its box, too.
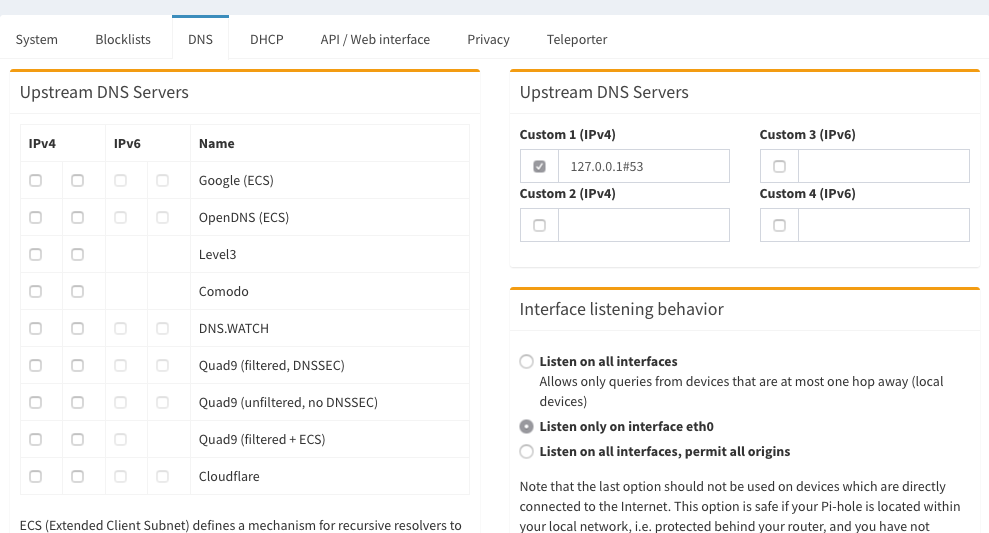
Then scroll down & click ‘Save’ at the bottom.
Finally, run a DNS query against your Pi-Hole (from another machine), putting your Pi’s IP address in:
> nslookup google.com <IP ADDRESS>
Server:         <IP ADDRESS>
Address:        <IP ADDRESS>#53

Non-authoritative answer:
Name:   google.com
Address: 172.217.14.238
If you get output like that ^, your Pi-Hole is correctly configured! Next up, make sure to make all your machines use your Pi-Hole’s IP address as their DNS server. The easiest way to do it network-wide is to set your DHCP server (normally your router) to use that IP as its only DNS server. Here’s what it looks like from my DHCP server config:

Once you’ve done that, your machines should start using the Pi-Hole as their DNS server as soon as they renew their DHCP lease. You can speed this along by forcing them to reconnect.
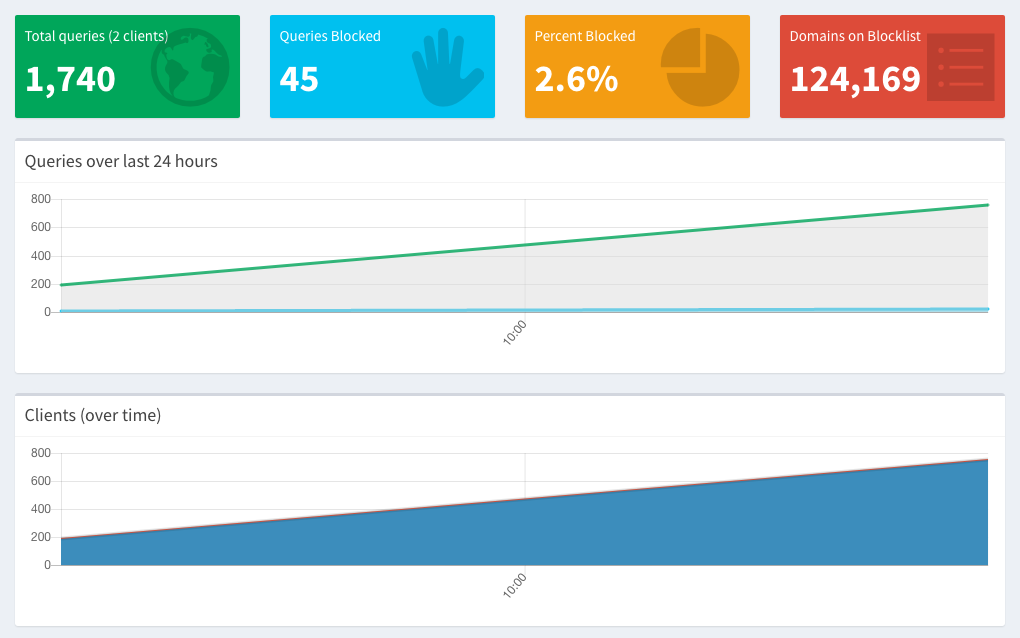
Once you’ve done that & they start using the Pi-Hole, your Pi-Hole Dashboard should start showing some traffic (and an increase in the number of clients), like this:
I hope this was helpful to you! I’ve you’ve got any questions, drop them in the comments below, and I’ll do my best to answer them.
Leave a Reply