Author: russt

  • Pi-Hole & DNS over HTTPS

    Pi-Hole & DNS over HTTPS

    There are some cool things about running your own DNS server. I use it to reference some web services that I run internally more easily, like my Unifi Controller, PiAware, and my home-grown Linux Server. It’s a lot easier than trying to keep track of the IP addresses of everything in your network.

    For that reason, I’ve been running my own DNS server for awhile now. For awhile, I was just running my own BIND instance. Unfortunately, probably because I’m just not familiar with it, it wasn’t very stable. Luckily, something even better came along: Pi-Hole.

    What’s Pi-Hole?

    Pi-Hole is a stable, free, and lightweight DNS server with built-in adblocking abilities. The coolest part is that it blocks ads across your network (assuming you tell all your devices to use it as their DNS server), even devices that don’t support things like adblocking extensions. In my case, it’s the perfect solution.

    My Old Approach

    For awhile, I’ve been running Pi-Hole in Docker on my Linux server. To keep my DNS encrypted (because really, who wants to expose all their DNS requests to their ISP?), I’ve been routing queries over a VPN. The problem with this is that if, for some reason, my VPN connection fails, my DNS stops, which means all my devices think they’re not connected to the Internet. Obviously, that’s not ideal.

    One other bit is that (probably through my own stupidity) my Docker container running Pi-Hole doesn’t automatically start up when I reboot the server. This has been a bother sometimes, even if it’s not something really serious. So I’ve decided to switch things up & figure out a way to make it more robust.

    Pi-Hole on a Raspberry Pi

    I’ve decided to start running Pi-Hole on a machine dedicated to the task. Since it’s designed for a Raspberry Pi, and I had an extra one (or two…) lying around, this seemed like a good way to go.

    So I downloaded Raspbian, flashed it onto a Micro SD card, and touched a new file called ssh to enable SSH access without having to plug in a mouse, keyboard, and monitor. Then I went to my router’s control panel to find the IP address of the Raspberry Pi so I could ssh in. Raspbian boots up with username pi and password raspberry – log in & change your password before continuing (ssh pi@<IP ADDRESS> and then passwd pi to change it).

    Finally, after changing the password, I ran through the Pi-Hole installation guide to get Pi-Hole itself set up. It’s about as simple and straightforward as it gets, honestly.

    When you finish the installation, make sure you take note of the web admin password that it outputs – you’ll need it later. If you don’t, you’ll be able to reset it from the command line when you need it).

    DNS over HTTPS

    To encrypt our DNS queries outside the network, we’re gonna make Pi-Hole use cloudflared‘s DNS proxy feature. The nice thing about this is that this service will only handle DNS traffic, and since the Raspberry Pi is only running cloudflared and Pi-Hole, there’s a lot less risk of things interfering with it than on my server. Plus, running both Pi-Hole and cloudflared as services mean they start automatically and can automatically restart if they fail.

    Installing cloudflared is pretty simple, since it’s a Golang binary. For a Raspberry Pi, download the ARM package from the Cloudflare Developers site. Assuming you’re using the command line, use these steps to download, extract, and move it into place:

    wget https://bin.equinox.io/c/VdrWdbjqyF/cloudflared-stable-linux-arm.tgz
    tar xzvf cloudflared-stable-linux-arm.tgz
    sudo chmod +x ./cloudflared
    sudo mv ./cloudflared /usr/local/bin

    Then, to verify it’s working, run cloudflared -v – it should output the version (as of now, it’s 2019.12.0).

    Run cloudflared as a Service

    Next up, we need to set up cloudflared‘s proxy-dns command as a service. First up, create a new user to run the service:

    sudo useradd -Mr -s /bin/nologin cloudflared

    Then, change the permissions on the executable so that it’s owned by our new user:

    sudo chown cloudflared:cloudflared /usr/local/bin/cloudflared

    To actually make the service, we put the following into /etc/systemd/system/cloudflared.service:

    [Unit]
    Description=cloudflared DNS Proxy
    After=syslog.target network-online.target
    
    [Service]
    Type=simple
    User=cloudflared
    ExecStart=/usr/local/bin/cloudflared proxy-dns --port=5053 --upstream https://1.1.1.1/dns-query --upstream https://1.0.0.1/dns-query
    Restart=on-failure
    RestartSec=5
    KillMode=process
    
    [Install]
    WantedBy=multi-user.target

    This will tell systemd how to run our service – we’re pointing it to Cloudflare’s https endpoints for DNS and telling it to listen on port 5053. It’ll restart automatically if it fails, and it won’t start up until after the network is online. Now we can start it up:

    sudo systemctl enable cloudflared
    sudo systemctl start cloudflared

    If you run sudo systemctl status cloudflared, it should now show you active (running) in the output. To test that it’s working properly, run nslookup -port=5053 google.com 127.0.0.1 (from your Raspberry Pi). You should see something like this as output:

    Server:         127.0.0.1
    Address:        127.0.0.1#5053
    
    Non-authoritative answer:
    Name:   google.com
    Address: 172.217.14.206
    Name:   google.com
    Address: 2607:f8b0:400a:803::200e

    With this command, we’re telling nslookup to point to localhost on port 5053, which is where we’re running our cloudflared proxy. If you get an error, you’ll have to troubleshoot it.

    Point Pi-Hole to Cloudflared

    The last thing we need to do is tell Pi-Hole to use our cloudflared proxy as its DNS server so that all its DNS requests are encrypted by HTTPS. Access your Pi-Hole’s web interface by entering its IP address in your browser. Click ‘login’ on the left and enter the password that Pi-Hole output when you first installed it. If you lost the password (or didn’t write it down), you can reset it by entering pihole -a -p '<PASSWORD>' in the SSH console of your Raspberry Pi.

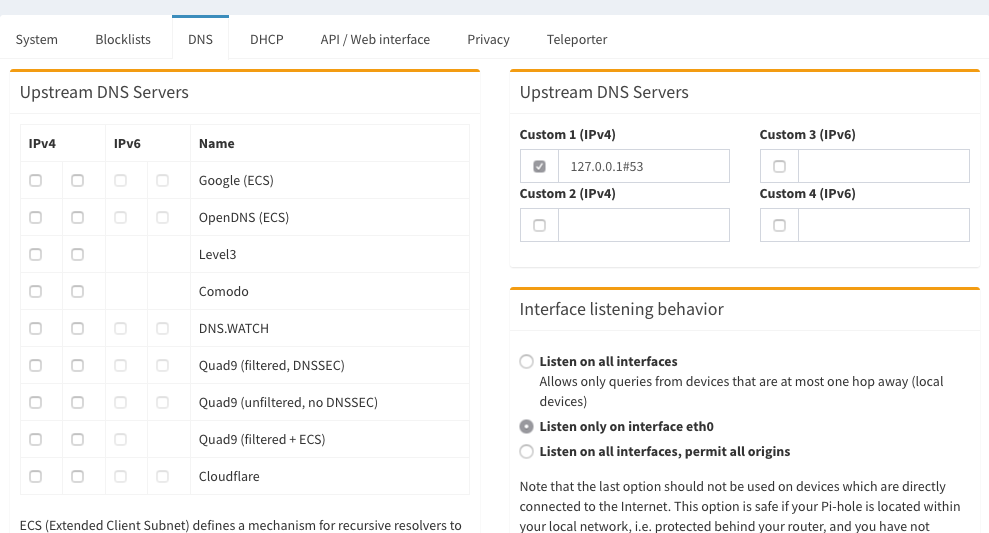
    Then click ‘Settings’ in the left panel, then ‘DNS’ in the tabs at the top after that. In the resulting settings panel, uncheck all the boxes on the left-hand side, and enter 127.0.0.1#5053 in the ‘Custom 1 (IPv4)’ box on the right. Make sure you check its box, too.
    Then scroll down & click ‘Save’ at the bottom.

    Finally, run a DNS query against your Pi-Hole (from another machine), putting your Pi’s IP address in:

    > nslookup google.com <IP ADDRESS>
    Server:         <IP ADDRESS>
    Address:        <IP ADDRESS>#53
    
    Non-authoritative answer:
    Name:   google.com
    Address: 172.217.14.238

    If you get output like that ^, your Pi-Hole is correctly configured! Next up, make sure to make all your machines use your Pi-Hole’s IP address as their DNS server. The easiest way to do it network-wide is to set your DHCP server (normally your router) to use that IP as its only DNS server. Here’s what it looks like from my DHCP server config:

    Once you’ve done that, your machines should start using the Pi-Hole as their DNS server as soon as they renew their DHCP lease. You can speed this along by forcing them to reconnect.

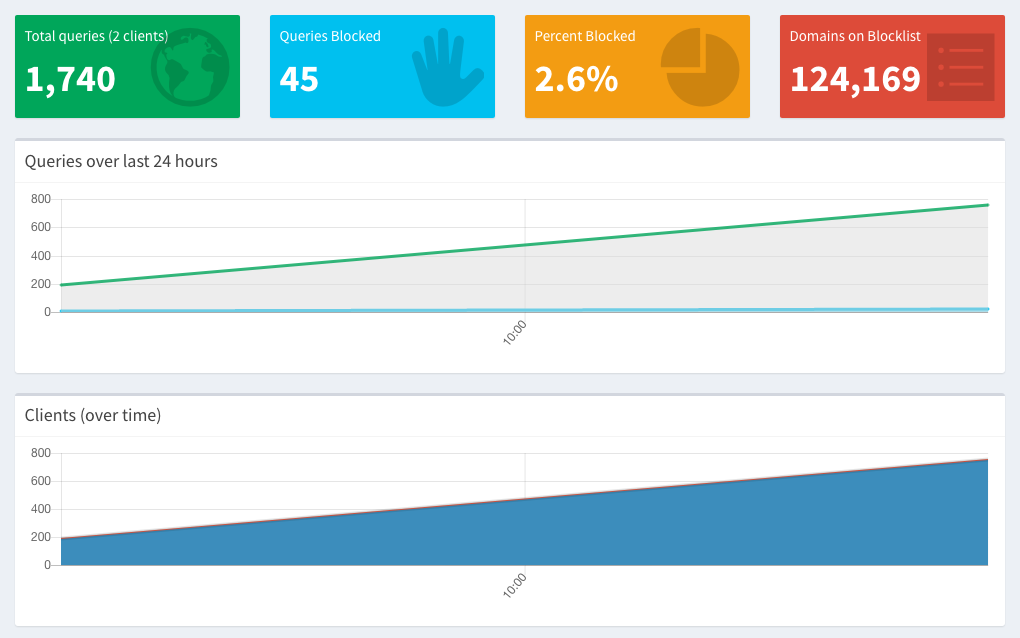
    Once you’ve done that & they start using the Pi-Hole, your Pi-Hole Dashboard should start showing some traffic (and an increase in the number of clients), like this:
    I hope this was helpful to you! I’ve you’ve got any questions, drop them in the comments below, and I’ll do my best to answer them.

  • Code Complete Notes, Chapter 3, Section 5: Architecture

    Code Complete Notes, Chapter 3, Section 5: Architecture

    Architecture, according to the book (which draws from other sources as well), is:

    Software architecture is the high-level part of software design, the frame that holds the more detailed parts of the design.

    S. McConnell, Code Complete, second edition. Redmond (Washington): Microsoft Press, 2004.

    Now that’s out of the way, let’s talk about how we can make sure that the architecture that’s laid out for our projects is good, since that’s what this chapter is all about. If your architecture is off at this stage, you’ll have to make the changes when you’re in the construction stage… That makes them a lot more difficult to solve, because you’ll likely have to move other things that you’ve already built around as you make the changes.

    If you’re working on a system that was architected by someone else, you should be able to find the important components without a bloodhound, a deer-stalker cap, and a magnifying glass.

    S. McConnell, Code Complete, second edition. Redmond (Washington): Microsoft Press, 2004.

    The important parts of your architecture should be clearly visible. If it’s not clear why a class or component exists, or why it was chosen over other alternatives, then it’s possible it needs to be better defined.

    Architectural Components

    Photo by Iker Urteaga on Unsplash

    I was originally going to outline the different components and give a few details on each, but then I realized I’d mostly just be paraphrasing the book. Since there’s no need to do that, here’s a list of the architectural components, along with some of my associated thoughts.

    • Program Organization
    • Major Classes
    • Data Design
    • Business Rules
    • User Interface Design
    • Resource Management
    • Security
    • Performance
    • Scalability
    • Interoperability
    • Internationalization & Localization
    • Input/Output
    • Error Processing
    • Fault Tolerance
    • Architectural Feasibility
    • Overengineering
    • Buy vs. Build Decisions
    • Reuse Decisions
    • Change Strategy
    • General Architectural Quality

    Now, it seems to me that a lot of these, such as the User Interface Design, depend a lot on the type of development that you’re going for. If you’re developing in a waterfall-style approach, then it’s great to have it fully defined upfront. However, I think that most modern software development occurs much more iteratively – so perhaps these should all be thought of in shorter iterations.

    If you’re developing using an ‘agile’ approach, it seems like it’d make sense to have these things laid out at the beginning of a sprint. But it all depends on the approach you’re using. I know I’ve never used a strict agile methodology, so you have to apply this where you see fit.

    This is covered a bit in the ‘Change Strategy’ point, but I still don’t feel like it fully addresses more iterative development approaches. It’s possible I’m just missing something, though.

    Conclusion

    Anyway, the point is that for any development, you definitely should have at least a basic architecture in place. Even if you’re developing iteratively, think through the things in the list above so that you can define an overview of the system before you put your fingers to the keyboard & start coding.

    It shouldn’t look as if the problem and the architecture have been forced together with duct tape.

    S. McConnell, Code Complete, second edition. Redmond (Washington): Microsoft Press, 2004.
  • Code Complete Notes, Chapter 3, Sections 2 and 3

    Code Complete Notes, Chapter 3, Sections 2 and 3

    Defining the Problem

    Section 2 of Chapter 3 is very simple: you should know what problem you’re trying to solve before you try to solve it. It normally shouldn’t be stated in technical terms. Instead, it should be the simplest issue that you’re trying to solve.

    For example, “We need developers to be able to parallelize their tests” isn’t a good problem definition, it’s already settled on a solution. “Developers’ tests take way too long to run” would be much better, because it states the problem, not a solution.

    Defining Requirements

    Section 3 covers devising the requirements for your software project. These should be agreed upon before work begins, and the customer should be the one in charge of validating the requirements.

    Crafting well-defined requirements before starting the actual coding is important. It costs a lot more to adjust a design to meet new or updated requirements after code has been written than it does to just write the code to fit the requirements in the first place.

    Specifying requirements adequately is a key to project success, perhaps even more important than effective construction techniques.

    S. McConnell, Code Complete, second edition. Redmond (Washington): Microsoft Press, 2004.

    But of course, requirements are rarely perfectly defined. It’s hard for customers (and developers, too!) to accurately describe requirements initially. As customers come to understand the system better, they’ll be better able to develop accurate requirements. So no matter how much we want things to be perfect the first time, it’s unlikely to ever happen in practice.

    … the average project experiences about a 25 percent change in requirements during development.

    S. McConnell, Code Complete, second edition. Redmond (Washington): Microsoft Press, 2004.

    Dealing with changing requirements can be difficult, but it can be made easier by making it clear to your customer or client that changes cost, often monetary (though that depends on the type of project) and almost always in terms of time. If a customer is too happy-go-lucky with changes, establishing a change-control board to review the proposed changes may also be helpful (though I’d imagine that’s mostly where you’re doing client work).

    One other important consideration is keeping the business reason for the project in mind. Oftentimes, you’ll find that features that sound neat or even necessary won’t be so important when you consider the main reason for the project.

    Finally, this section concludes with a series of questions to ask yourself about your project’s requirements to ensure they’re solid. Reference the book directly for the list.

  • Code Complete Notes, Chapter 3, Section 2

    Code Complete Notes, Chapter 3, Section 2

    Different types of software require different types of planning. If you’re working on your own blog, for instance, the stakes are a lot lower than if you’re working on, say, an automated flight control system.

    If you’re working on one of those high-stakes projects, your planning should be much more thorough & much less iterative. Your development is much more likely to follow a waterfall approach. But on your blog, or even something like an e-commerce site, you can (and arguably should) be a lot more iterative.

    In either case, specifying more prerequisites upfront will help save time and effort in the long run, but it’s more important in more sequential projects. But, of course, your project’s balance between sequential and iterative will depend largely on what type of project it is and the risks involved.

    One common rule of thumb is to plan to specify about 80 percent of the requirements up front…

    S. McConnell, Code Complete, second edition. Redmond (Washington): Microsoft Press, 2004.

    Essentially, you’ll need to pick the right balance for your project. If it’s something more stable, where the requirements are well understood and unlikely to change, a more sequential approach is appropriate. But if the requirements may change, or the structure isn’t as well understood, then a more iterative approach will be more beneficial.

    Software being what it is, iterative approaches are useful much more often than sequential approaches are.

    S. McConnell, Code Complete, second edition. Redmond (Washington): Microsoft Press, 2004.

    For more details (as well as an analysis of the potential costs associated with each approach), check out this section of the book.

  • Code Complete, Chapter 3, Section 1 Commentary

    Code Complete, Chapter 3, Section 1 Commentary

    This is the second post in my series on Code Complete, covering my notes and commentary from Chapter 3, Section 2. The title of this section is Measure Twice, Cut Once: Upstream Prerequisites.

    Essentially, this section is talking about the importance of developing prerequisites before beginning work on a project. It reminds me of a phrase that was apparently one of Frank Lloyd Wright’s favorites:

    The architect’s two most important tools are: the eraser in the drafting room and the wrecking bar on the site.

    Frank Lloyd Wright

    In Software, this is equally applicable. The easier that we can catch defects, from design to development to production, the easier they are to fix. Obviously, in Wright’s quote above, using the eraser would be significantly cheaper than using a wrecking bar.

    Much of the success or failure of the project has already been determined before construction begins.

    S. McConnell, Code Complete, second edition. Redmond (Washington): Microsoft Press, 2004.

    The diagram below is one that I created for a presentation given at Etsy – it’s a very generalized diagram, not representative of any actual set of data. However, it gives an idea of the relative cost to fix defects that are introduced during the software development process.

    This section in Code Complete features a similar diagram – but backed by more solid data. Essentially, the earlier that defects are detected and corrected, the cheaper they are to fix.

    …debugging and associated rework takes about 50 percent of the time spent in a typical software development cycle…

    S. McConnell, Code Complete, second edition. Redmond (Washington): Microsoft Press, 2004.

    So really, the whole point of this section is that planning reduces the overall cost of software development. Of course, this doesn’t mean that we should do everything in a waterfall approach and attempt to plan everything before we even start coding. We have to strike a balance between the two.

    I believe, when using Agile methodologies, we should ensure that we plan carefully for the features that we’re focusing on building. Whether you’re using sprints or not, you can plan ahead for the work that you’re doing to ensure that you’re minimizing the ‘rework’ required.

    It’s by striking a balance between planning too much and planning too little that we can be most effective in our software projects.

    If you start the process with designs for a Pontiac Aztek, you can test it all you want to, and it will never turn into a Rolls-Royce.

    S. McConnell, Code Complete, second edition. Redmond (Washington): Microsoft Press, 2004.
  • Code Complete, Chapters 1 and 2

    Code Complete, Chapters 1 and 2

    Hello, everyone! I’ve recently started reading Code Complete (the second edition), by Steve McConnell. I haven’t made it very far into it yet, but I figured that I’d share the things that I learn or find interesting here.

    I realized that when I read, it helps me to take notes and focus on highlighting so that I can increase my comprehension. So here I am, writing down some notes that I gather as I read Code Complete.

    Software Construction

    Something that was new to me was the idea of Software Construction. Software Construction encompasses coding, debugging, detailed design (not graphic design, mind you), testing, and integration. In essence, the things that we normally think of when we think of software development.

    McConnell focuses Code Complete on Software Construction, rather than architecture, project management, or user interface design . He says that very few books released before the first edition of Code Complete had covered it directly.

    It seems to me that a lot of books had touched on the topic of Construction, but it did seem like few had chosen to address it directly. Honestly, it feels like a majority of the books written regarding Software Development cover specific languages or frameworks. Of course, that could just be the fact that I never had a formal Computer Science education and therefore wasn’t exposed to that during my education. So that’s the value in this book – it’s trying to cover all the different aspects of Software Construction in one place.

    Anyway, I don’t know why I hadn’t heard of Software Construction before, but I simply hadn’t. Really, though, the idea makes a lot of sense. McConnell also touches on the value of metaphors in understanding Software Construction, and it seems to me that just calling it Construction to begin with is itself a metaphor.

    Metaphors

    McConnell covers several different metaphors that software construction has been compared to over the years, including writing, farming, oysters (accretion), and construction. Of these, I found construction to be the most applicable.

    Software must be architected first, just like buildings. Without a plan, your building/software isn’t going to end up very nice. Remodels are like refactors or adding additional functionality to software. Bigger buildings (or bigger software projects) require more planning than smaller projects.

    One example that McConnell gives is that of building a dog house. You don’t really need to plan much ahead to build a dog house. Likewise, a tiny software project probably doesn’t require much in the way of architecture. But if you’re building a skyscraper, that takes an awful lot more work and planning. You wouldn’t just want to go to the hardware store & pick up some random materials for your skyscraper, but that’s feasible in the case of a dog house.

    The one area where I think this breaks down some (but not entirely) is in refactoring and adding additional features. It’s still a lot easier to work on software than it is to add on to a house. A lot of software, especially web-based software, can be continually improved. That’s more difficult to do with a building. Not impossible, just more difficult.

    Anyway, that covers my thoughts on Chapters 1 and 2 of Code Complete. Keep your eyes peeled for more posts covering my thoughts on the book.

  • Using `xarg` to pass to `find`

    I just found myself needing to run wc -l on all the files in a list of directories – in my case, I had a big old list of directories with a matching name. But I wanted to calculate the total number of files in those directories.

    Unfortunately, find is very particular about where its arguments go, so running xargs and passing it to find was resulting in the following:

    find: paths must precede expression: tmp/dir/name
    Usage: find [-H] [-L] [-P] [-Olevel] [-D help|tree|search|stat|rates|opt|exec] [path...] [expression]

    Luckily, the solution is pretty simple. Use the -I flag to xargs to make it replace {} with your argument.

    So your full command will look something like this:

    cat list_of_directories.txt | xargs -I{} find {} | whatever

    The command that I ended up with is this:

    find . -name "dir_name" | xargs -I{} find {} -type f | wc -l

    I hope that’s helpful for you.

    (Reference: http://xion.io/post/code/shell-xargs-into-find.html)

  • Working with Bare Repos in Git

    Working with Bare Repos in Git

    When we think about git and git repos, we don’t often think about separating the .git repo itself from the working directory.  But we can actually have a lot of fun with bare repos. They give you a lot of flexibility, and when you’re doing things like deploying code or running builds, that’s useful.

    Searching the web, it’s actually not super easy to find info on how to do this. I figured that writing up a post on it would be helpful both for me and for anyone who finds this.

    Creating a --bare Clone

    Cloning a repo bare is easy enough. When you run git clone, you simply include the --bare flag. It’ll create a directory that is identical to the .git directory inside your normal old git checkout. The convention is to name this directory <whatever>.git, but that’s optional. The only difference between this checkout and your normal repo’s .git directory is that the config file will have bare = true. So to wrap up, your whole clone command will look like this: git clone --bare [email protected]:<org|user>/<repo-name>.git <repo-name>.git.

    Now, because you have a bare repo, a few things are probably different from the repos that you’re accustomed to working with:

    • There’s no ‘working directory’
    • Nothing is ‘checked out’
    • You aren’t ‘on’ a branch

    The cool thing is that using a bare repo actually lets you work with a few working directories, if you want. Each working directory will be free of a .git directory, so they’ll be smaller and not contain the entire history of your project.

    Updating a Bare Repo

    To update your repo, you’re going to use a fetch command, but you’re going to specify an environment variable beforehand. You’ll want to point GIT_DIR to your bare checkout:

    GIT_DIR=~/my_repo.git git fetch origin master:master

    The master:master at the end of the command is telling git to get the changes from your origin‘s master branch and update your local master branch to match. If you want to update some other branch or from some other remote, you can adjust your command accordingly. If you’re looking to update all the branches in your repo, change out the master:master and put use --all instead.

    Checking Out from a Bare Repo

    Checking out from your bare repo is going to be almost identical to checking out anything in a normal repo, but you’ll need two environment variables specified: GIT_DIR and GIT_WORKING_DIR. Your command will look a lot like this:

    GIT_DIR=~/my_repo.git \
    GIT_WORKING_DIR=~/my_checkout/ \
    git checkout -f origin master

    The -f will discard any changes that have been made in the working directory. In most cases where you’ll be using this, that’s preferable to a failure just because something has changed in the directory.

    This command will be the same whether you’re checking it out for the first time or updating it to the latest.

    Hopefully that helps you (and me)! If you’ve got any questions or comments, of if I’ve made any errors, let me know in the comments below!

  • Wildcard Certs w/Let’s Encrypt & Cloudflare

    Wildcard Certs w/Let’s Encrypt & Cloudflare

    Awhile back, when wildcard certs first became available from Let’s Encrypt, I wrote a post about using Google Cloud DNS to create wildcard certificates. Since then, however, it’s come to my attention that Cloudflare offers DNS for free that interacts with an API. So I figured, why not move over to use Cloudflare’s DNS, instead? This post explains how to set up wildcard certs using Cloudflare’s DNS.

    Setting up Cloudflare

    Before you do anything else, you’ll need an account with Cloudflare. If you already have one, that’s great! You’ll need to import whatever domain you want to set up wildcard certs for – just follow the steps that Cloudflare gives you. The awesome thing is that Cloudflare will automatically detect your existing records (or at least try to) and import them for you. It might miss some, so just be aware and manually add any that it’s missing.

    Finally, you’ll need to retrieve your Cloudflare API key, so that certbot can add the records that Let’s Encrypt needs to verify your ownership of the domain. To do that, you’ll need to click the ‘profile’ dropdown in the top right, then click ‘My Profile’:

    'My Profile' link on Cloudflare

    Then, scroll down to the bottom of the page, where you’ll see links to get your API keys:

    API Keys section of Cloudflare

    Click ‘View’ next to show your Global API Key. Naturally, make note of this – you’ll need it later on.

    Issuing Certificates

    Like we did in our previous post, we’re going to use Docker to run certbot so that we can get our certificates without installing certbot and its dependencies. I’m doing this for the sake of simplicity, but if you’d rather avoid Docker, you’re free to install everything.

    Credentials

    To use our API key, we need to have it wherever we’re running our Docker container from. In my case, I’m running it on my web server, but you can run it from any machine. Following the Cloudflare docs from Certbot, I used the following format for my credentials:

    # Cloudflare API credentials used by Certbot
    dns_cloudflare_email = [email protected]
    dns_cloudflare_api_key = 0123456789abcdef0123456789abcdef01234567

    I placed the file in my ~/.secrets/certbot directory, called cloudflare.ini. I’ll be able to mount this directory to the Docker container later, so it’ll be available to certbot running inside the container.

    Volumes

    We’ll need to mount a few things so that our Docker container has access to them – first off, we need the credentials to be accessible. Second, we need to mount the location where the certificates will be placed, so that they persist when we shut down our container. And finally, we’ll mount the location where certbot places its backups. In the end, our Docker volume will look something like this:

    -v "/etc/letsencrypt:/etc/letsencrypt" \
    -v "/var/lib/letsencrypt:/var/lib/letsencrypt" \
    -v "/home/$(whoami)/.secrets/certbot:/secrets"

    Docker & Certbot Arguments

    Now, we just have to formulate the entire command to grab our certificate. Here’s the command we’ll be using, with the explanation below:

    sudo docker run -it --name certbot --rm \
        -v "/etc/letsencrypt:/etc/letsencrypt" \
        -v "/var/lib/letsencrypt:/var/lib/letsencrypt" \
        -v "/home/$(whoami)/.secrets/certbot:/secrets" \
        certbot/dns-cloudflare \
        certonly \
        --dns-cloudflare \
        --dns-cloudflare-credentials /secrets/cloudflare.ini \
        --server https://acme-v02.api.letsencrypt.org/directory \
        -d '*.example.com' \
        -d 'example.com'

    So here’s what we’re telling Docker to do:

    • --name certbot: Run a container named certbot
    • --rm: Remove that container after it’s run
    • -v flags: mount the volumes we specified above
    • certbot/dns-cloudflare: Run certbot’s dns-cloudflare image
    • certonly: We’re only issuing the certificate, not installing it
    • --dns-cloudflare: Tell certbot itself (inside the image) that we’re using Cloudflare’s DNS to validate domain ownership
    • --dns-cloudflare-credentials <path>: Specify the path (inside the container) to the credentials
    • --server <server>: Use the acme-v02 server, the only one that currently supports wildcard certificates
    • -d <domain-name>: Issue the certificate for the specified domain name(s)

    Since my last post, I realized that by using the -d flag twice, once for *.example.com and once for example.com, you can get a single certificate that covers example.com and all of its subdomains.

    Conclusion

    That’s really all there is to it! You’ll have a nice, new certificate sitting on your disk, just waiting to be used. If you’ve got any comments or questions, drop them in the section down below!

  • Revamping my Dotfiles with Zgen

    Revamping my Dotfiles with Zgen

    I’ve recently spent some time reworking my dotfiles repo. Up to this point, I’ve mostly just taken what someone else has made available, changed it to work just enough for me, and left it at that. Finally, I’ve put in some time to update them so that they’ll work better for me.

    As part of this transition, I’ve made the move from Antigen over to Zgen. It’s not really a big change, but I like the fact that with Zgen, you only run the update check when you want to, and not every single time that a new shell loads. Of course, this opens you up to the possibility of updating everything on a cron as well (which I’d highly recommend).

    My dotfiles were originally taken from Holman‘s dotfiles repo. As you do with dotfiles repos, I’ve modified them quite a bit since I first copied his repo, and I need to do some updating to get some of the more recent stuff that he’s added, but for now they’re working for me.

    Configuring Zgen

    Installing Zgen is easy:

    git clone https://github.com/tarjoilija/zgen.git "${HOME}/.zgen"

    Next up, you’ll need to add zgen (and install plugins) in your .zshrc file, like this:

    source "${HOME}/.zgen/zgen.zsh"
    if ! zgen saved; then
    echo "Creating a zgen save"
        zgen oh-my-zsh
    
        # plugins
        zgen oh-my-zsh plugins/git
        zgen oh-my-zsh plugins/sudo
        zgen oh-my-zsh plugins/command-not-found
        zgen load zsh-users/zsh-syntax-highlighting
        zgen load zsh-users/zsh-history-substring-search
        zgen load bhilburn/powerlevel9k powerlevel9k
        zgen load junegunn/fzf
    
        # completions
        zgen load zsh-users/zsh-completions src
    
        # theme
        zgen oh-my-zsh themes/arrow
    
        # save all to init script
        zgen save
    fi

    Those are the plugins that I’m currently using, though I’m looking for more that might be useful. Now, you get all of these awesome things without having to install them all separately, plus whatever else you add. And because you’re using Zgen, not Antigen, they’ll only update (& check for updates) when you want them to, rather than every single time that you open your shell.

    To update your plugins (which you should definitely do periodically), all you have to do is run zgen update. It really couldn’t be simpler!

    Once I get more done with my dotfiles, I’ll throw more of it up here so you can check it out. Until then, I hope this is helpful!