Category: Technology

  • Wildcard Let’s Encrypt Certificates with Certbot and GCP

    Wildcard Let’s Encrypt Certificates with Certbot and GCP

    As of last month (March 8th-ish, 2018), Let’s Encrypt supports wildcard certificates! This is great news, because it means that those of us who like using tons of subdomains can now get one cert for all our subdomains, rather than having to get a cert for every single subdomain.

    As you may know, Certbot is the tool provided by the EFF that you use to interact with and issue certs from Let’s Encrypt. It used to be called letsencrypt-auto, but when the EFF took it over, it switched names to Certbot.

    Now, it’s not quite as easy to get wildcard certs as it is to get normal certs – mainly because there are some prerequisites. The nice thing is, some of these prerequisites make it easier to issue and renew certificates without temporarily disabling your web server.

    Prerequisites

    The certbot docs aren’t super clear about a lot of this, so you have to do some digging, but essentially it boils down to this:

    I’ve decided to just go with Google Cloud DNS, because I’m already doing some  other stuff in Google Cloud Platform, and it’s really quite affordable for what I need. Sure, it’s not as cheap as just using the DNS that your registrar provides, but I know mine doesn’t provide an API, especially not one supported by certbot.

    Setting up Google Cloud DNS

    To get Google Cloud DNS set up, you’ll obviously need a Google account. If you don’t have one, well, I’ll leave it to you to get one. Then you’ll need to set up Google Cloud Platform – once again, I’ll leave that to you. You’ll also need to set up a project for your DNS records. If you already have a project, you can feel free to use that.

    Set up a Service Account

    Next up, you’ll need to set up a ‘Service Account’ that will let you access the GCP DNS API with restricted permissions, so that you can safely put the credentials on a box that’ll handle your renewals without having to fully authenticate with GCP yourself. To start out, click the ‘hamburger’ menu on the left, then find ‘IAM & admin’, and finally ‘Service Accounts’:
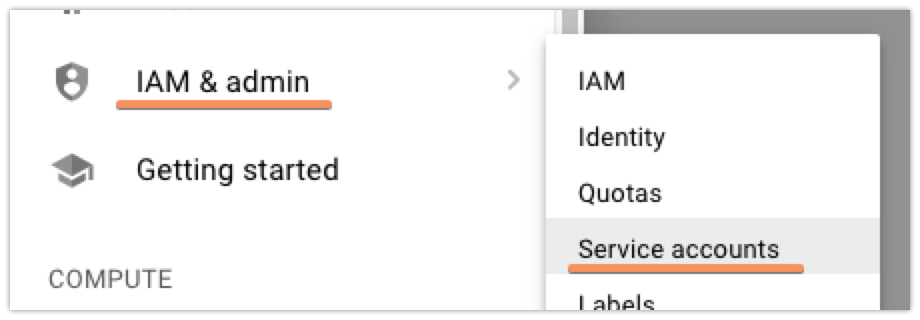
    Access the Service Accounts Screen

    Once there, you’re going to want to click the ‘Create Service Account’ button at the top. Currently, the Cloud DNS permissions and whatnot are in beta, so that means that while you could create a custom role that would have exactly the permissions that you need, those are subject to change and there’s a decent chance that you’d need to recreate your service account later. To avoid this, I just made my new service account into a ‘DNS Administrator’. It’s got more permissions than I strictly need, but I’m not super worried about that.
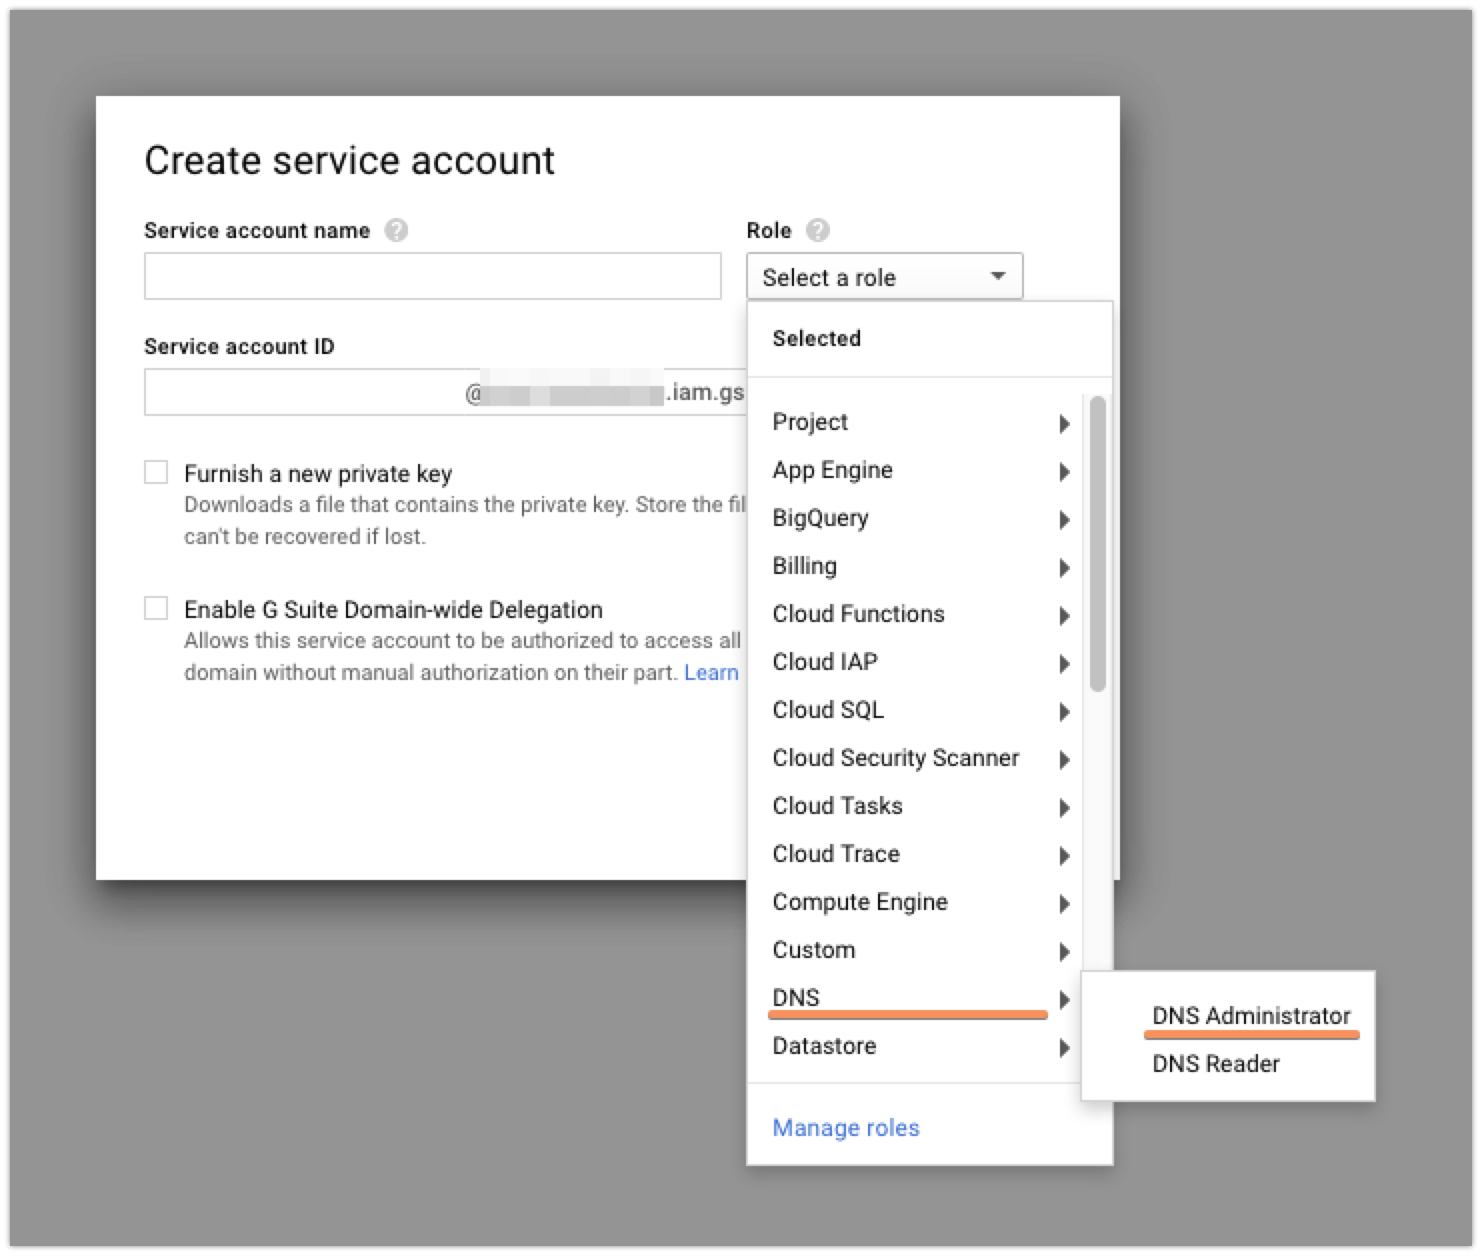
    Assign a Role

    After you give your service account a name, you’ll want to check the ‘Furnish a new private key’ box so that you can download the credentials file that you’ll need to access the API later:
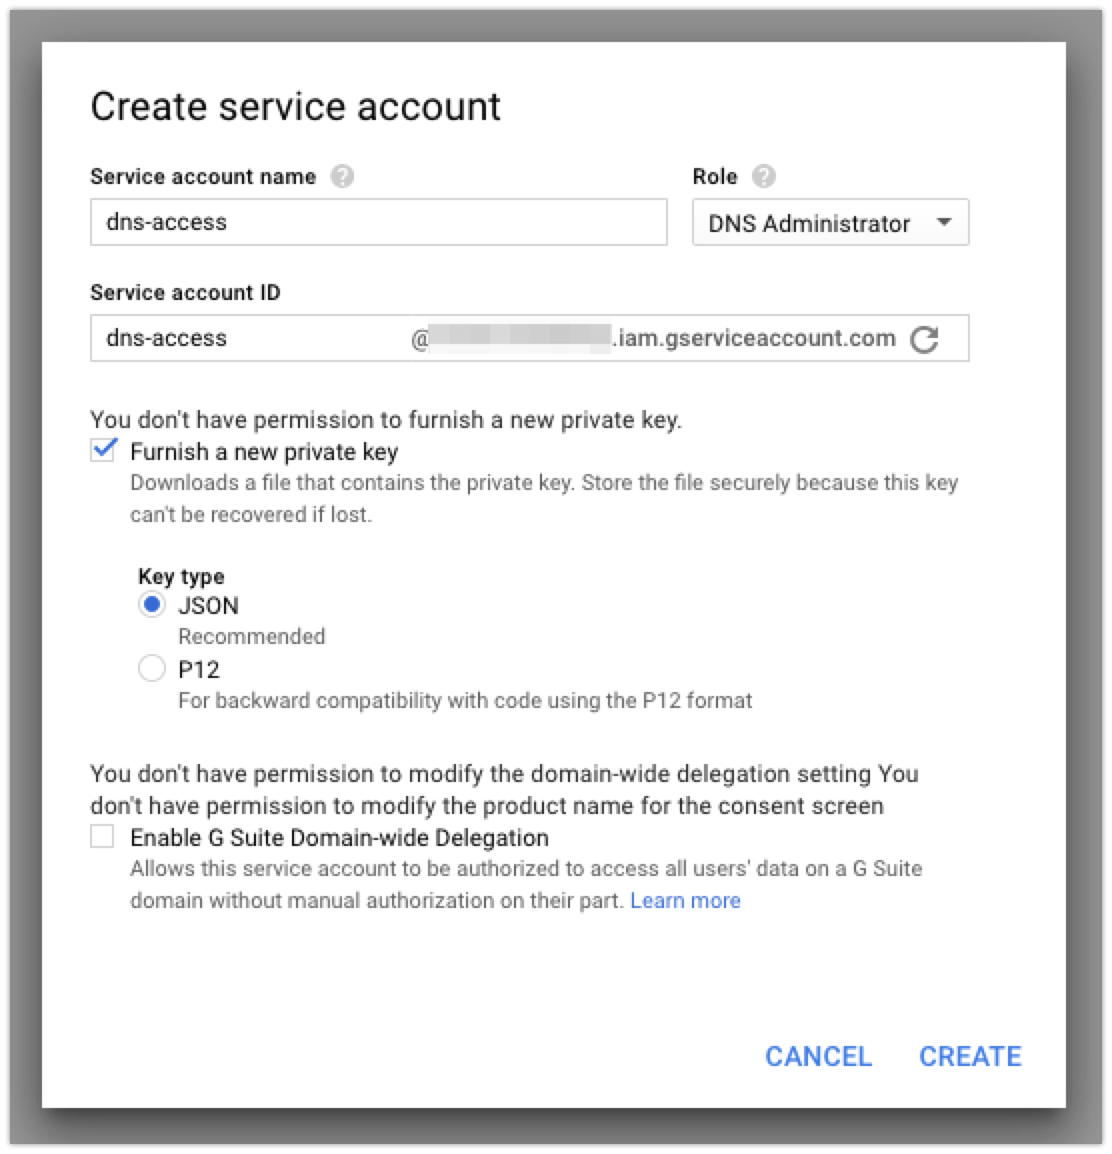
    Create Your Service Account

    When you create your account, it should automatically download the JSON file with the credentials. I copied that key to the server I’m using to issue certificates (my good ‘ole Linode server!) so that I can use it later.

    Creating your DNS Zone

    Naturally, to do anything with DNS, you need to have a domain to do something with. You’ll have to point your registrar to Google/your DNS provider of choice before you can actually issue a wildcard certificate.

    I set up my domain in Google Cloud DNS before I switched anything at my domain registrar, so that I wouldn’t have to worry about any downtime where my site was unreachable. To do this, you’ll first want to access the Cloud DNS control panel in GCP:
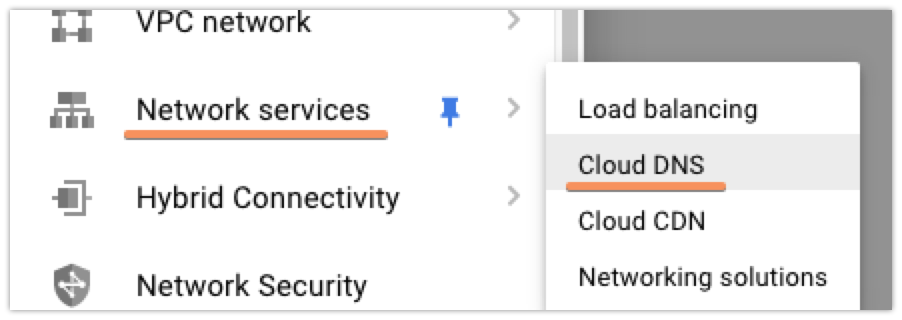
    Access the Cloud DNS Console

    Next up, click the ‘Create Zone’ button at the top of the console. Then, you’ll enter the information for your domain:
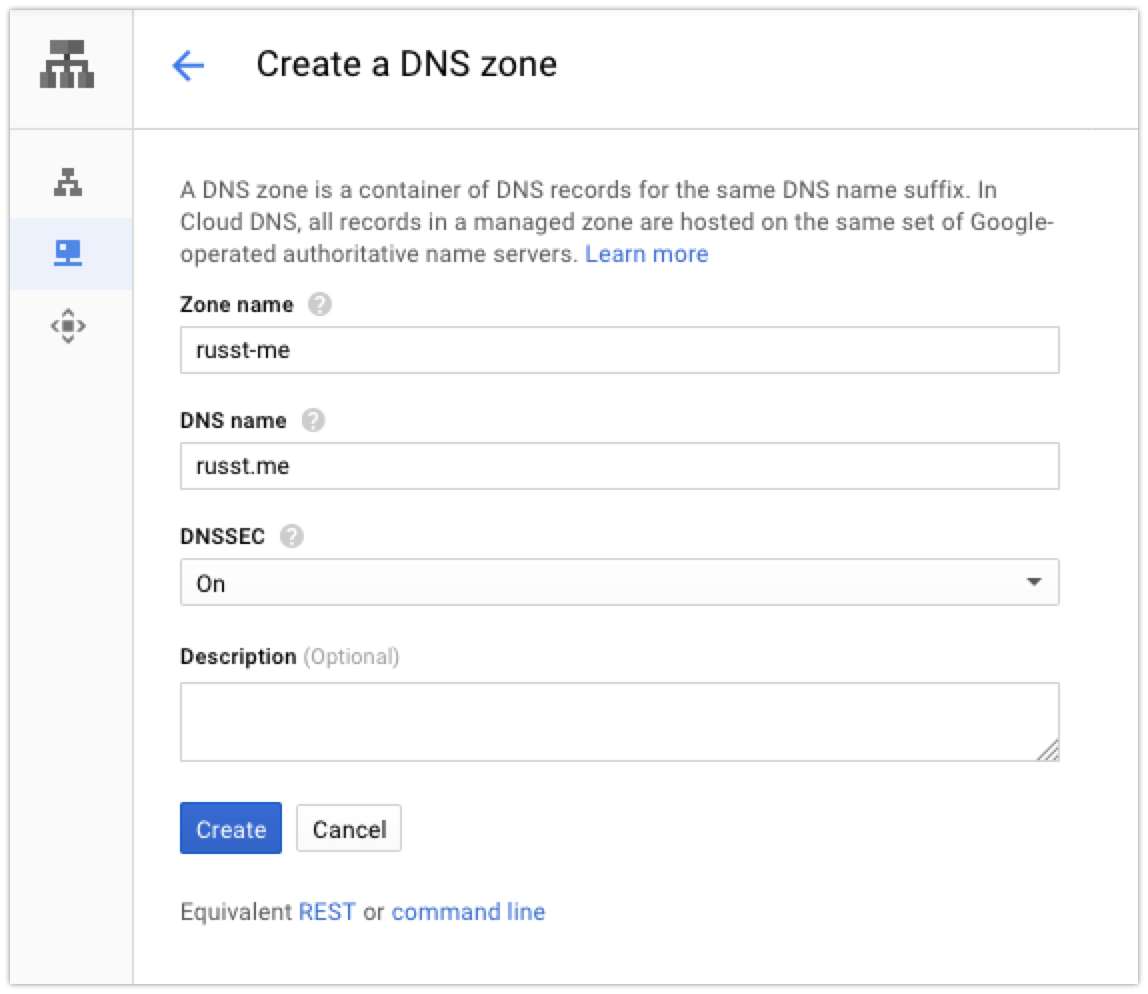
    Create a DNS Zone example

    Then you’ll create some records for your domain. At the very least, you’ll probably want one A record pointing to your server, but you can also create subdomains or whatever else you want. If you’re copying your config from somewhere else, put in all the records that you had on your previous provider. I had quite a few records, but even so it didn’t take very long.

    Finally, you’ll update the nameservers to point to your DNS provider. I use a few different registrars, but they all make this part pretty easy. In this particular case, I was using Hover – all I had to do was click their ‘Edit Nameservers’ link near the domain I wanted to adjust, and put in Google’s nameserver addresses:
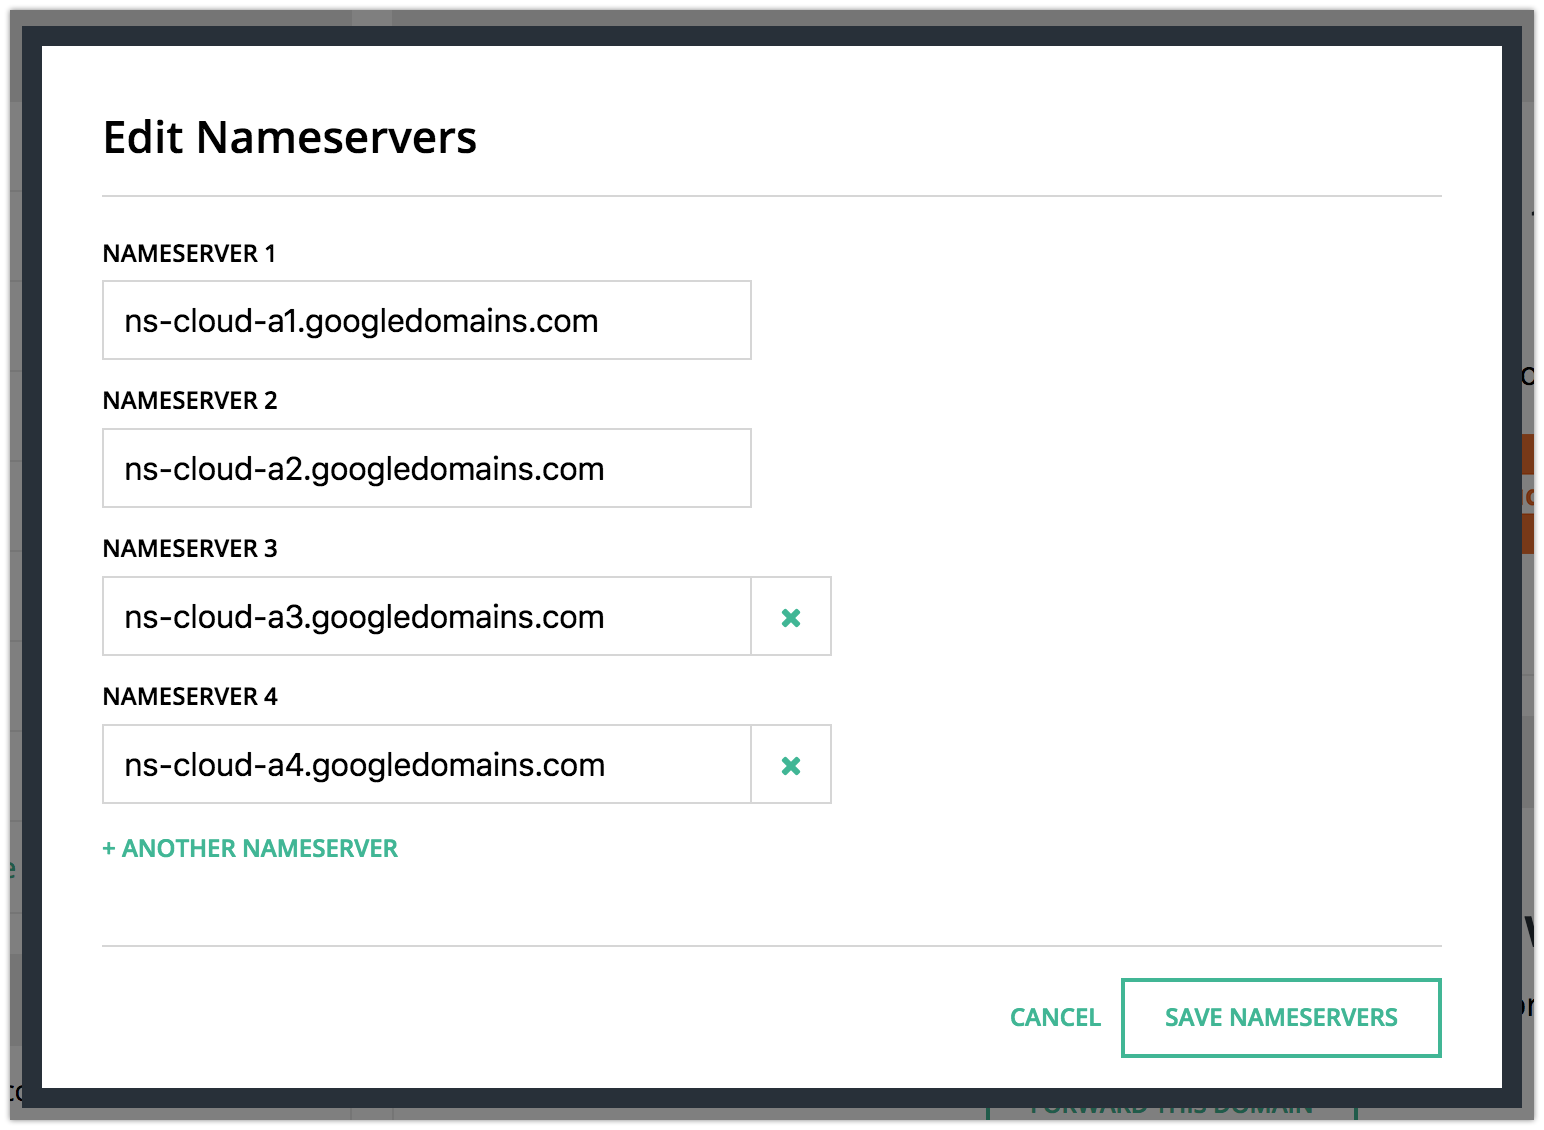
    Editing Nameservers

    You’ll need to put in whatever your DNS provider wants, but if you’re using Google, the above should work. Once you’ve done that, you might have to wait a few minutes for your DNS to switch over to your new provider. It only took a couple of minutes in my case. I used the DNS lookup tool at MxToolbox to figure out when it switched. It shows your nameserver at the bottom, like this:
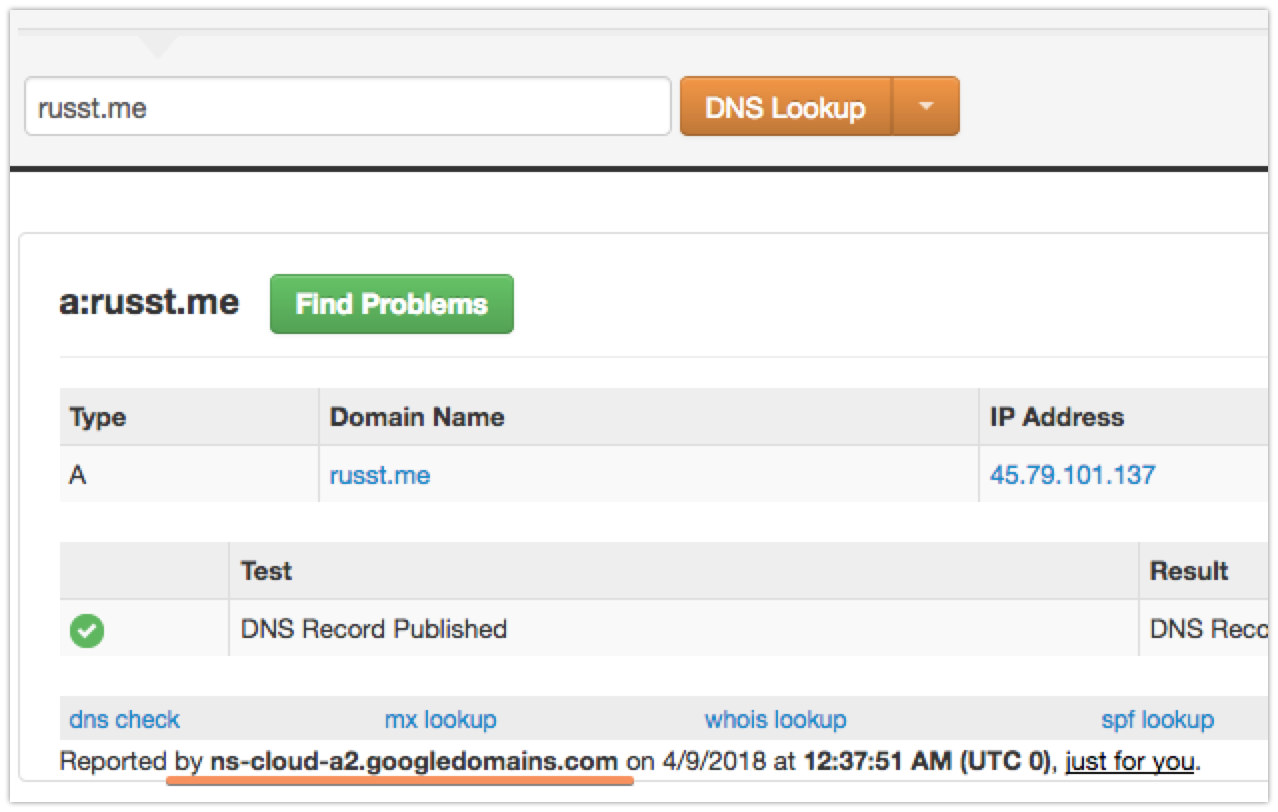
    Once that’s updated to your new provider, you’re ready to get issuing certificates!

    Using Docker to Issue the Certificates

    Now, we can do something really nifty here to renew our accounts. Instead of installing certbot-auto on our server, we can just always use the latest up-to-date version in a preconfigured, lightweight Docker container. Sure, this requires you having Docker installed, but who doesn’t these days? If you’d rather, you can do this all manually with your own certbot-auto installation, but I chose to go the Docker route, for simplicity’s sake.

    Now it’s actually pretty simple to just run our Docker container. We just need to get the correct arguments, and we’ll be good to go. Note, this does require that you have locations set up where you want to put your certificates, otherwise they’ll just float off into the ether when your container shuts down.

    Configuring our Volumes

    So first up, let’s create the place we want our certificates to be placed. In my case, I’m going to stick with the default, since my server has already been storing Let’s Encrypt certificates there anyway: /etc/letsencrypt. This is where Let’s Encrypt stores all its configuration and certificates by default. If you’re putting it somewhere else, go ahead and create that directory. Keep note of it for later, naturally. Later, we’re going to map our Docker container to use that as a volume.

    Next up, we need to create the place where Let’s Encrypt will store backups. I guess this isn’t strictly necessary (mine is empty anyway), but I figure it can’t hurt. By default it’s in /var/lib/letsencrypt. So we’ll also be mounting that.

    Finally, we need to mount the directory where you put your GCP service account’s credentials. I’ve put mine in ~/.secrets/certbot and changed the name to google.json, but you can put it wherever you want and call it whatever you want, really.

    So these are going to end up being arguments like this when we run our docker command:

    -v "/etc/letsencrypt:/etc/letsencrypt" \
    -v "/var/lib/letsencrypt:/var/lib/letsencrypt" \
    -v "/home/$(whoami)/.secrets/certbot:/secrets"

    Docker & Certbot Arguments

    The image that we’re going to be using (assuming you’re sticking with Google DNS) is certbot/dns-google. If you’re using another DNS provider, you can probably figure out pretty easily which image you’ll need.

    In the command itself, we’ll also need to use the certonly command, signifying to certbot that we don’t want to have it try to actually install the certificates for us, we only want it to issue them. I personally prefer installing them myself anyway, and that would be very difficult and/or impossible to do from within a Docker container anyway.

    We’re also telling certbot to use Google’s DNS with --dns-google, and we’re giving it the path to the credentials file with --dns-google-credentials <file-path>. The last thing we have to do is manually specify the Let’s Encrypt server that we’re using, because right now, wildcard certs are only supported by one server: --server https://acme-v02.api.letsencrypt.org/directory. That should do it for our arguments.

    All this means that our full docker command will look like this:

    sudo docker run -it --name certbot --rm \
        -v "/etc/letsencrypt:/etc/letsencrypt" \
        -v "/var/lib/letsencrypt:/var/lib/letsencrypt" \
        -v "/home/$(whoami)/.secrets/certbot:/secrets" \
        certbot/dns-google \
        --dns-google \
        --dns-google-credentials /secrets/google.json \
        --server https://acme-v02.api.letsencrypt.org/directory \
        -d '*.russt.me'

    Of course, if you’ve made any adjustments in the way you’re doing this, you’ll need to adjust the command itself. The final line is the important one, -d '*.russt.me, is telling certbot to issue a new wildcard certificate for *.russt.me. You’ll want to make sure you change it, because, well, I’d rather you not issue certificates for my domain. Plus, unless you’ve hacked my Google DNS account, you probably don’t have access.

    With any luck, you’ll see some output that looks a lot like this:

    Saving debug log to /var/log/letsencrypt/letsencrypt.log
    Plugins selected: Authenticator dns-google, Installer None
    Obtaining a new certificate
    /usr/local/lib/python2.7/site-packages/josepy/jwa.py:107: CryptographyDeprecationWarning: signer and verifier have been deprecated. Please use sign and verify instead.
      signer = key.signer(self.padding, self.hash)
    Performing the following challenges:
    dns-01 challenge for russt.me
    Unsafe permissions on credentials configuration file: /secrets/google.json
    Waiting 60 seconds for DNS changes to propagate
    Waiting for verification...
    Cleaning up challenges
    
    IMPORTANT NOTES:
     - Congratulations! Your certificate and chain have been saved at:
       /etc/letsencrypt/live/russt.me-0001/fullchain.pem
       Your key file has been saved at:
       /etc/letsencrypt/live/russt.me-0001/privkey.pem
       Your cert will expire on <date>. To obtain a new or tweaked
       version of this certificate in the future, simply run certbot
       again. To non-interactively renew *all* of your certificates, run
       "certbot renew"

    I’ve cleaned it up a bit, but that’s the gist. I chose to ignore the ‘Unsafe permissions’ warning, since I’m running this in a Docker container anyway and the file on my system actually does have the correct permissions.

    Last Thoughts

    I’ll leave the configuration and use of these certificates up to you. Hopefully, you have some idea of how to use the certificates on your own server. If not, there are guides all over that should help you out.

    I’m extremely thankful to both the EFF and to Let’s Encrypt for enabling us all to issue free SSL certificates, and it’s even better now that they’re letting us issue wildcard certificates. If you’re also feeling thankful, head on over to the EFF’s donation page or Let’s Encrypt’s donation page and drop a donation for them. The web will thank you for it.

    If you’ve got any questions or comments, feel free to drop them in the comments below! I’ll do my best to get back to you. Extra props if you correct an error or tell me a better way to do this.

  • Building Large Docker Images, Quickly

    Building Large Docker Images, Quickly

    Sometimes, you've just got a big codebase. Maybe you want to put that codebase into a Docker image. Sure, you could mount it, but sometimes that's either not an option or would be too much trouble. In those cases, it's nice to be able to cram your big 'ole codebase into images quickly.

    Overview

    To accomplish this, we're going to have 3 main layers in our image. Of course, you're welcome to add as many layers as you want, or even take one away. We'll just use 3 for demo purposes – and because that's what's worked in my situation.

    The first image will be what we call the 'base' image. It's the one that we're going to copy our code into. On top of that, we'll build an image with our dependencies – it's our 'dependency' image. Finally, we've got our 'incremental' image, which just has our code updates. And that's it. So three images: base, dependency, and incremental.

    Luckily, the first two images don't have to build quickly. They're the images that we use to prepare to build the incremental image, so that the incremental build can be quick when we need it.

    The Base Image

    So the first image, the base image, has our codebase and any universal dependencies. The reason we don't want to put other dependencies in here is because we want to be able to use this 'base' image for any type of task that will require our code. For example, if we have JavaScript tests and, say, PHP tests, they'll probably require different dependencies to run. While we may have a huge codebase, we're still trying to stick to the idea that Docker images should be as small as possible.

    This image is actually pretty simple to set up. Here's an example of a Dockerfile:

    FROM centos:latest
    
    RUN yum -y install patch && yum -y clean all
    
    COPY repo /var/repo
    
    ARG sha=unknown
    LABEL sha=$sha

    You'll notice that I'm installing the patch utility. That's because we're going to use this in the incremental image later on to apply a diff to our code. If you have any binary files in your image, you might want to install git instead, because git handles binary diffs, where patch doesn't.

    Now, at the end there, we're doing something that you don't necessarily see in every Dockerfile. When we build this image, there are a few more things we should do. We're including the sha argument so that later on we can generate the right diff that we need to apply to get the latest code. We need to pass this in to the docker build command as a --build-arg, and this last bit of the Dockerfile will add that as a label to the image itself. You can see an example on Stack Overflow.

    We also should avoid copying in parts of the codebase that we don't need in the image. For example, we probably don't need our .git/ folder in our Docker image. There are a couple of ways that we can accomplish this – we can either do a --bare checkout of our repo, or we can just delete the .git folder before we copy it in. I took the first approach, because it allows me to just update my repo and check things out again.

    I used a bash script to handle all this, so that I don't have to remember everything and I don't have to worry about accidentally skipping things. Here's what my base image building script looks like, approximately:

    #!/bin/bash
    
    # This allows you to pass in an environment variable, but sets a default.
    CODE_DIR=${CODE_DIR:-'/var/tmp/repo.git'}
    
    # If the repo already exists, just update it. Otherwise, clone it.
    if [ -d "$CODE_DIR" ]; then
        echo "Found an existing git clone... Fetching now to update it..."
        GIT_DIR=$CODE_DIR git fetch -q origin master:master
    else
        echo "No clone found. Cloning the entire repo."
        git clone --mirror [email protected]:my/repo.git $CODE_DIR
    fi
    
    # This grabs the sha we'll be building
    BUILD_VERSION=$(GIT_DIR=$CODE_DIR git rev-parse master)
    
    mkdir -p ./repo
    
    # We clean the old directory to make sure it's a 'clean' checkout
    rm -rf ./repo/*
    
    # Check out the code
    GIT_DIR=$CODE_DIR GIT_WORK_TREE=./repo git checkout $BUILD_VERSION -f
    
    # Build the image
    docker build --rm -t base-image:latest --build-arg sha=$BUILD_VERSION
    
    docker push base-image:latest

    So, it's not super simple (if you want to skip the .git/ folder), but I think you get the idea. Next, we'll move on to the dependencies image.

    The Dependencies Image

    This image is really only necessary if you have more dependencies to install. In my particular case, I needed to install things like php, sqlite, etc. Next up, I installed the composer dependencies for my project. If you're using something other than PHP, you can install the dependencies through whatever package manager you're using – like bundler or npm.

    My Dockerfile for this image looks a lot like this (the particular incantations you use will depend on the flavor of linux you're using, of course):

    FROM base-image:latest
    
    RUN yum -y install \ 
        php7 \
        sqlite \
        sqlite-devel \
        && yum -y clean all
    
    WORKDIR /var/repo
    
    RUN composer update

    You'll probably notice in this image, we don't need to include the whole ARG sha=unknown thingy. That's because labels applied to a parent image are automatically passed to child images.

    This image doesn't necessarily need to have a bash script to build it, but it all depends on what your dependencies look like. If you need to copy other information in, then you might just want one. In my case, I have one, but it's pretty similar to the previous script, so I won't bother to put it here.

    The Incremental Image

    Now for the fun part. Our incremental image is what needs to build quickly – and we're set up to do just that. This takes a bit of scripting, but it's not super complicated.

    Here's what we're going to do when we build this image:

    1. Update/clone our git repo
    2. Figure out the latest sha for our repo
    3. Generate a diff from our original sha (the one the base image has baked-in) and the new sha
    4. When building the image, copy in and apply the diff to our code

    To handle all of this, I highly recommend using a shell script. Here's a sample of the script that I'm using to handle the build (with some repetition from the script above):

    #!/bin/bash
    
    BASE_IMAGE_NAME=dependency-image
    BASE_IMAGE_TAG=latest
    
    # This allows you to pass in an environment variable, but sets a default.
    CODE_DIR=${CODE_DIR:-'/var/tmp/repo.git'}
    
    # If the repo already exists, just update it. Otherwise, clone it.
    if [ -d "$CODE_DIR" ]; then
        echo "Found an existing git clone... Fetching now to update it..."
        GIT_DIR=$CODE_DIR git fetch -q origin master:master
    else
        echo "No clone found. Cloning the entire repo."
        git clone --mirror [email protected]:my/repo.git $CODE_DIR
    fi
    
    # Get the latest commit sha from Github, use jq to parse it
    echo "Fetching the current commit sha from GitHub..."
    BUILD_VERSION=$(curl -s "https://github.com/api/v3/repos/my/repo/commits" | jq '.[0].sha' | tr -d '"')
    
    # Generate a diff from the base image
    docker pull $BASE_IMAGE_NAME:$BASE_IMAGE_VERSION
    BASE_VERSION=$(docker inspect $BASE_IMAGE_NAME:$BASE_IMAGE_VERSION | jq '.[0].Config.Labels.sha' | tr -d '"')
    GIT_DIR=$CODE_DIR git diff $BASE_VERSION..$BUILD_VERSION > patch.diff
    
    # Build the image
    docker build --rm -t incremental-image:latest -t incremental-image:$BUILD_VERSION --build-arg sha=$BUILD_VERSION
    
    # And push both tags!
    docker push incremental-image:latest
    docker push incremental-image:$BUILD_VERSION

    There are a few things of note here: I'm using jq on my machine to parse out JSON results. I'm fetching the latest sha directly from GitHub, but I could just as easily use a local git command to get it. I'm also passing in the --build-arg, just like we did for our base image, so that we can use it in the Dockerfile as an environment variable and to set a new label for the image.

    On that note, here's a sample Dockerfile:

    FROM incremental-image:latest
    
    ARG sha=unknown
    ENV sha=$sha
    LABEL sha=$sha
    
    COPY patch.diff /var/repo/patch.diff
    RUN patch < patch.diff
    
    RUN composer update
    
    CMD ["run-my-tests"]

    And that's it! In my experience, this is pretty quick to run – it takes me about a minute, which is a lot faster than the 6+ minute build times I was seeing when I built the entire image every time.

    Assumptions

    I'm making some definite assumptions here. First, I'm assuming that you have a builder where you have git, jq, and docker installed. I'm also assuming that you can build your base and dependency images about once a day without time restraints. I have them build on a cron at midnight. Throughout the day, as people make commits, I build the incremental image.

    Conclusion

    This is a fairly straightforward method to build up-to-date images with code baked in quickly. Well, quickly relative to copying in the entire codebase every time.

    I don't recommend this method if building your images quickly isn't a priority. In my case, we're trying to build these images and run our tests in under 5 minutes – which meant that a 5 minute image build time obviously wasn't acceptable.

  • Alphabetic Filtering with Regex

    Alphabetic Filtering with Regex

    Last week, I found myself needing to filter things alphabetically, using regex. Basically, this is because PHPUnit lets you filter what tests you run with regex, and we (we being Etsy) have enough tests that we have to split them into many parts to get them to run in a reasonable amount of time.

    We've already got some logical splits, like separating unit tests from db-related integration tests and all that jazz. But at some point, you just need to split a test suite into, say, 6 pieces. When the option you have to do this is regex, well, then you just have to split it out by name.

    Splitting Tests by Name? That's not Smart.

    No, no it's not. But until we have a better solution (which I'll talk about in a later post), this is what we're stuck with. Originally, we just split the alphabet into the number of pieces we required and ran the tests that way. Of course, this doesn't result in even remotely similar runtimes on your test suites.

    Anyway, since we're splitting things up by runtime but we're stuck with using regex, we might as well use alphabetic sorting. That'll result in relatively short regular expressions compared to just creating a list of tests.

    To figure out where in the alphabet to make the splits for our tests, I downloaded all of our test results for a specific test suite and ran it through a parser that could handle JUnit-style output (XML files with the test results). I converted them into CSV's, and then loaded them into a Google Spreadsheet:

    Tests in Google Sheets

    This made it trivial to figure out where to split the tests alphabetically to even out the runtimes. The problem was, the places where it made sense to split our tests weren't the easiest places to create an alphabetic split. While it would've been nice if the ranges had been, say, A-Cd or Ce-Fa, instead they decided to be things like A-Api_User_Account_Test or Shop_Listings_O-Transaction_User_B.

    It's not easy to turn that into regex, but there is at least a pattern to it. I originally tried creating the regex myself – but quickly got in over my head. After about 100 characters in my regex, my brain was fried.

    I decided that it'd be easier, quicker, and less error-prone to write a script that could handle it for me.

    Identifying the Pattern

    It's really quite simple once you break it down. To find if a String is between A and Bob (not including Bob itself), you need a String that meets the following conditions:

    • Starts with A or a, OR
    • Starts with B or b, AND:
      • The second character is A-M or a-m OR
      • The second character is O or o, AND:
        • The third character is A or a

    In a normal 'ole regular expression, this looks like the following (ignoring all special characters):

    ^[Aa].*|^([Bb](.|[Oo]([Aa]|$)|$)).*$

    Now, if we've got something that complicated just to find something up to Bob, you can likely figure out that the rule would get much longer if you have many characters, like Beta_Uploader_Test_Runner.

    There's a recognizable pattern, but once again, it's pretty complex and hard for my weak human brain to grok when it gets long. Luckily, this is what computers are very, very good at.

    Formulating the Regex

    To get a range between two alphabetic options, you generally need 3 different regex rules. Let's say we're looking for the range Super-Whale. First, you need the range from the starting point to the last alphabetic option that still starts with the same letter. So, essentially, you need Super-Sz. The second thing you need is anything that starts with a letter between the first letter of the starting point and the first letter of the end point. So our middle range would be T-V. The last part needs to be W-Whale.

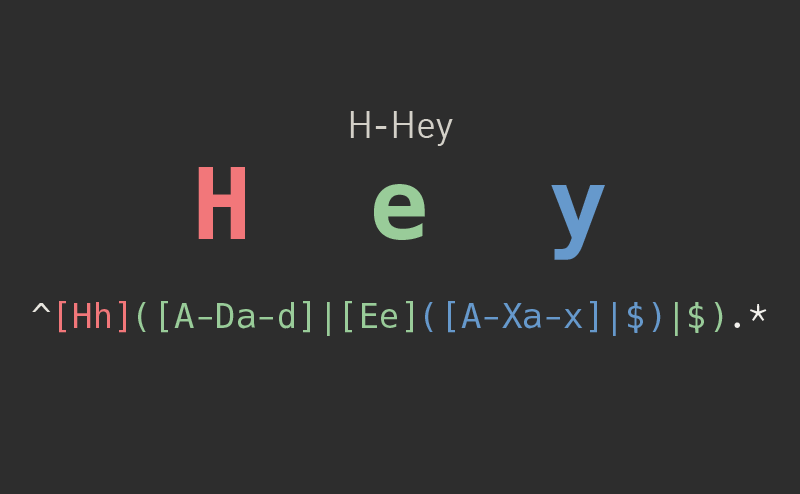
    By way of an example, here's a more simple version of the first part – in this case, it's Hey-Hz, color-coded so that you can see what letter applies to which part of the regular expression:

    Next up, we're using the same word as if it were the second part. In this case, H-Hey:

    Since the middle part is super simple, I won't bother detailing that. With those three elements, we've got our regex range. Of course, there are some more details around edge cases and whatnot, but we'll ignore those for now. It's much simpler for the purposes of blog posts.

    Doing some Test-Driven Development

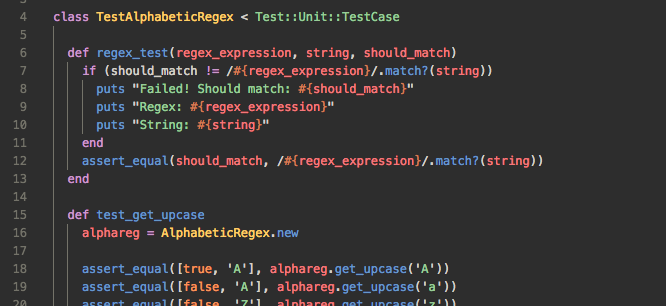
    I decided that the best way to make this, you know, actually work, was to write a bunch of tests that would cover many of the edge cases that I could hit. I needed to make sure that these would work, and writing a bunch of tests is a good way to do so.

    This helped me know exactly what was going wrong, and I wrote more tests as I kept writing the code. For every method that I wrote, I wrote tests to go along with it. If I realized that I had missed any necessary tests, I added them in, too.

    Overall, I'd say this significantly increased my development speed, and it definitely helped me be more confident in my code. Tests are good. Don't let anyone tell you otherwise.

    The Code on GitHub

    Of course, it doesn't make sense to restrict this code to just me. I couldn't find any good libraries to handle this for me, so I wrote it myself. But really, it only makes sense to make this available to a wider audience.

    I've still got some issues to work out, and I need to make a Ruby gem out of it, but in the meantime, feel free to play around with the code: https://github.com/russtaylor/alphabetic-regex

    I'm really hoping that someone else will find this code to be useful. If anyone has any questions, comments, or suggestions, feel free to let me know!

  • Starting up the Blog Again

    Starting up the Blog Again

    Hey everyone – I know that very few people are following this, but I wanted to let you all know that I'm going to be posting with a weekly cadence starting again now.

    The posts will be almost entirely tech-related, since that's what I do now. I've got a couple of posts in the pipeline already, I just need to flesh them out and provide good examples.

    I may throw in a photography-related post once in awhile, since that's one of my biggest hobbies, and I have a lot of fun with it.

    Anyway, I just wanted to get this out there publicly so that I will be forced to be more accountable to it.

  • Anker USB-C to USB A Cable Review

    Anker USB-C to USB A Cable Review

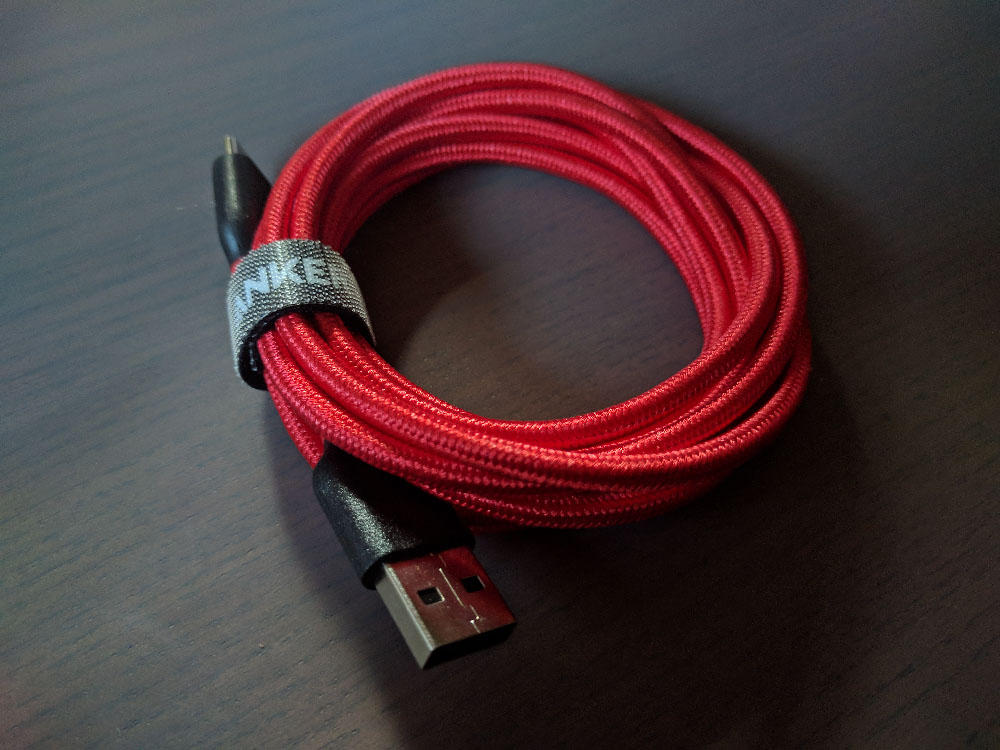
    I was recently given a sample of Anker’s new 6ft USB-C to USB A cable (They also come in a 3 foot variant). Actually, I guess I should say that I was given two samples, since they come in a pack. I’ve been using them over the past week and a half, and I’ve got to say, I’m very impressed. Granted, I think you could successfully classify me as an Anker fanboy, because I love pretty much every single one of their products that I have.

    These cables are no exception. The nylon wrapping is awesome – to me it seems far superior to just a rubber cable. It’s more durable, it’s super flexible, and it really feels like it’s built to last. The connections at the end are sturdy and they hold well when plugged in to both my phone and my charger/computer. Finally, the red color on the nylon wrap looks pretty cool. It looks a lot nicer than either a plain black or plain white cable, and I think it’ll look a lot better when dirty than rubber white cables do.

    I think my only complaint about the nylon wrap would be that I think it’d tend to fray a bit over time. Since I haven’t had these cables for very long, I can’t say whether or not that’ll actually happen, just that it seems likely. Of course, even if it does happen, it’d be easy enough to clean them up with a quick pass of a lighter.

    Overall, these are another great product in Anker’s lineup. I’m looking forward to using them for at least the next few years.

  • Moving or Distributing Your Docker Build Cache

    Recently, I hit an issue where building docker images on containers meant that the Docker cache wasn’t being persisted from one build to the next. So even if you ran an identical build on the next run, it’d still rebuild every step, costing you valuable time.

    Luckily, it’s not too difficult to save your Docker cache and to restore it (or distribute it) to other machines. It’s a bit more difficult than it used to be, but with a bit of scripting magic, it’s easy enough.

    How it Used to Be

    Apparently (though before I started working much with Docker), when you used to push a Docker image to a remote repository, it’d include all layers of that image. That means when you pulled in image, you’d get its entire history as well. This made things easier for distributing or restoring the cache, because all you had to do was pull the image. Unfortunately, it also made things clunky, in that you had to download more data than you actually needed to run the image.

    Shortly after that, Docker supported saving the entire cache using docker save -o file.tar <image_name> and restoring it using docker load -i file.tar. But now, docker save has been streamlined, too, so saving your cache isn’t quite as simple as it used to be.

    Saving Your Cache

    Luckily, despite those changes, you can still use the docker save command to get your image’s full cache – the catch is that you have to save all the layers listed in your image’s docker history.

    So, to save your image’s cache, run the following command: docker save -o output.tar $(docker history -q <image_name>[:image_tag] | tr '\n' ' ' | tr -d '<missing>')

    This runs docker history with the -q (quiet) tag, so it only shows the ids of each layer. Since you’re probably building FROM another image, much of the history will show <missing>, because you don’t have the entire history of the image you’re building FROM.

    Next up, the command pipes the output to tr twice, to clear out any \ns and any <missing> output. So, in the end, you get a list of image IDs passed directly to docker save.

    Loading Your Cache

    Loading your cache is exactly how it used to be – after you’ve copied or moved the tar file containing your cache, just run docker load -i <filename> and you’ll have your cache all ready to go!

  • Using Docker for WordPress Theme & Plugin Development

    Using Docker for WordPress Theme & Plugin Development

    In the time since I actually learned something about deploying to the web, I’ve been extremely unhappy with my WordPress development workflow. As a result, I haven’t developed any WordPress themes or plugins in quite a few years. I’ve just used themes and plugins as-is, but I’ve finally decided that I want to actually build myself a decent theme.

    WordPress Development Challenges

    There are a few challenges associated with developing on WordPress. First, you (of course) want your theme/plugin files under source control, but they still have to be inside the WordPress directory (okay, you could solve this with symlinks). But then you’re still running a local install of Apache, PHP, and MySQL, or else you’re doing your development directly on a VM or something. I generally prefer not having MySQL and Apache running all the time on my development machine. And, as you may suspect, I certainly don’t want the core WordPress files under source control. That’d just make for plenty of trouble when upgrading WordPress or installing/enabling/disabling themes or plugins.

    A Containerized Solution

    Luckily, it’s actually really easy now to set up a docker-based solution. So you can develop and run the site locally, keep your files under source control, but not have to be running an Apache/MySQL/PHP stack on your development machine (at least not directly).

    First up, you’ll need to install Docker (if you haven’t already). I won’t go into the details here, but you can get a start by heading to the Docker Community Edition page. Once you’ve got it installed, create a new directory for your project (unless you’ve already got one). Inside that directory, create a new file called docker-compose.yml.

    We’re going to use Docker Compose, which is a tool which can launch multiple containers and link them together as necessary. This is super useful for use cases like ours, because we need to set up a container for both WordPress and MySQL. In your docker-compose.yml file, put the following:

    version: '2'
    
    services: 
        wordpress: 
            image: wordpress:php7.1
            ports:
                - 8080:80
            environment:
                WORDPRESS_DB_PASSWORD: super-secure-password
            volumes:
                - ./{DIRECTORY}:/var/www/html/wp-content/{themes/plugins}/{DIRECTORY}
        mysql:
            image: mariadb
            environment:
                MYSQL_ROOT_PASSWORD: super-secure-password
    

    Of course, you’ll want to replace super-secure-password with an actual password (not quite so important for local development), and replace the two {DIRECTORY}s with the directory that you’re developing your project in. In my case, it’s a starter theme. Finally, replace {themes/plugins} with the proper directory, depending on whether you’re developing a plugin or a theme. I used themes, since I’m developing a theme.

    Now, what this is doing is telling Docker that we want two images: One ‘WordPress’ image (you can see the list of available versions on this Docker Store page) and one ‘MySQL image’. In this case, I’m using mariadb.

    We’re then configuring the containers by passing them environment variables – the same password being passed to both images. This’ll actually let them connect to each other. In case you hadn’t guessed it, these are set up by the creators of each image to allow you to configure them on-the-fly.

    Finally, we’re mapping a local directory to /var/www/html/wp-content/..., which will place our local files in the correct directory in the actual WordPress container. It’s pretty awesome.

    All you need to do now is run docker-compose up, wait for your containers to start, and then access your brand-spanking-new WordPress development site at http://localhost:8080. You’ll have to go through the installation, and if you want to, you can load in some sample data. When you want to stop it, just hit Ctrl+C in that console. Finally, you can enable your theme/plugin in your WordPress settings.

    I’ll leave it up to you to decide how exactly you want to deploy it, though.

    Conclusion

    Docker compose makes this super easy, and it takes very little configuration to get up and running. The extra bonus is that you can check your docker-compose.yml file into your source control, and then you’ve got it saved for later development (or development from another machine). All you need is Docker (and an Internet connection, at least to start).

  • Running WordPress with TLS/SSL on Apache and Nginx as Reverse Proxy

    Running WordPress with TLS/SSL on Apache and Nginx as Reverse Proxy

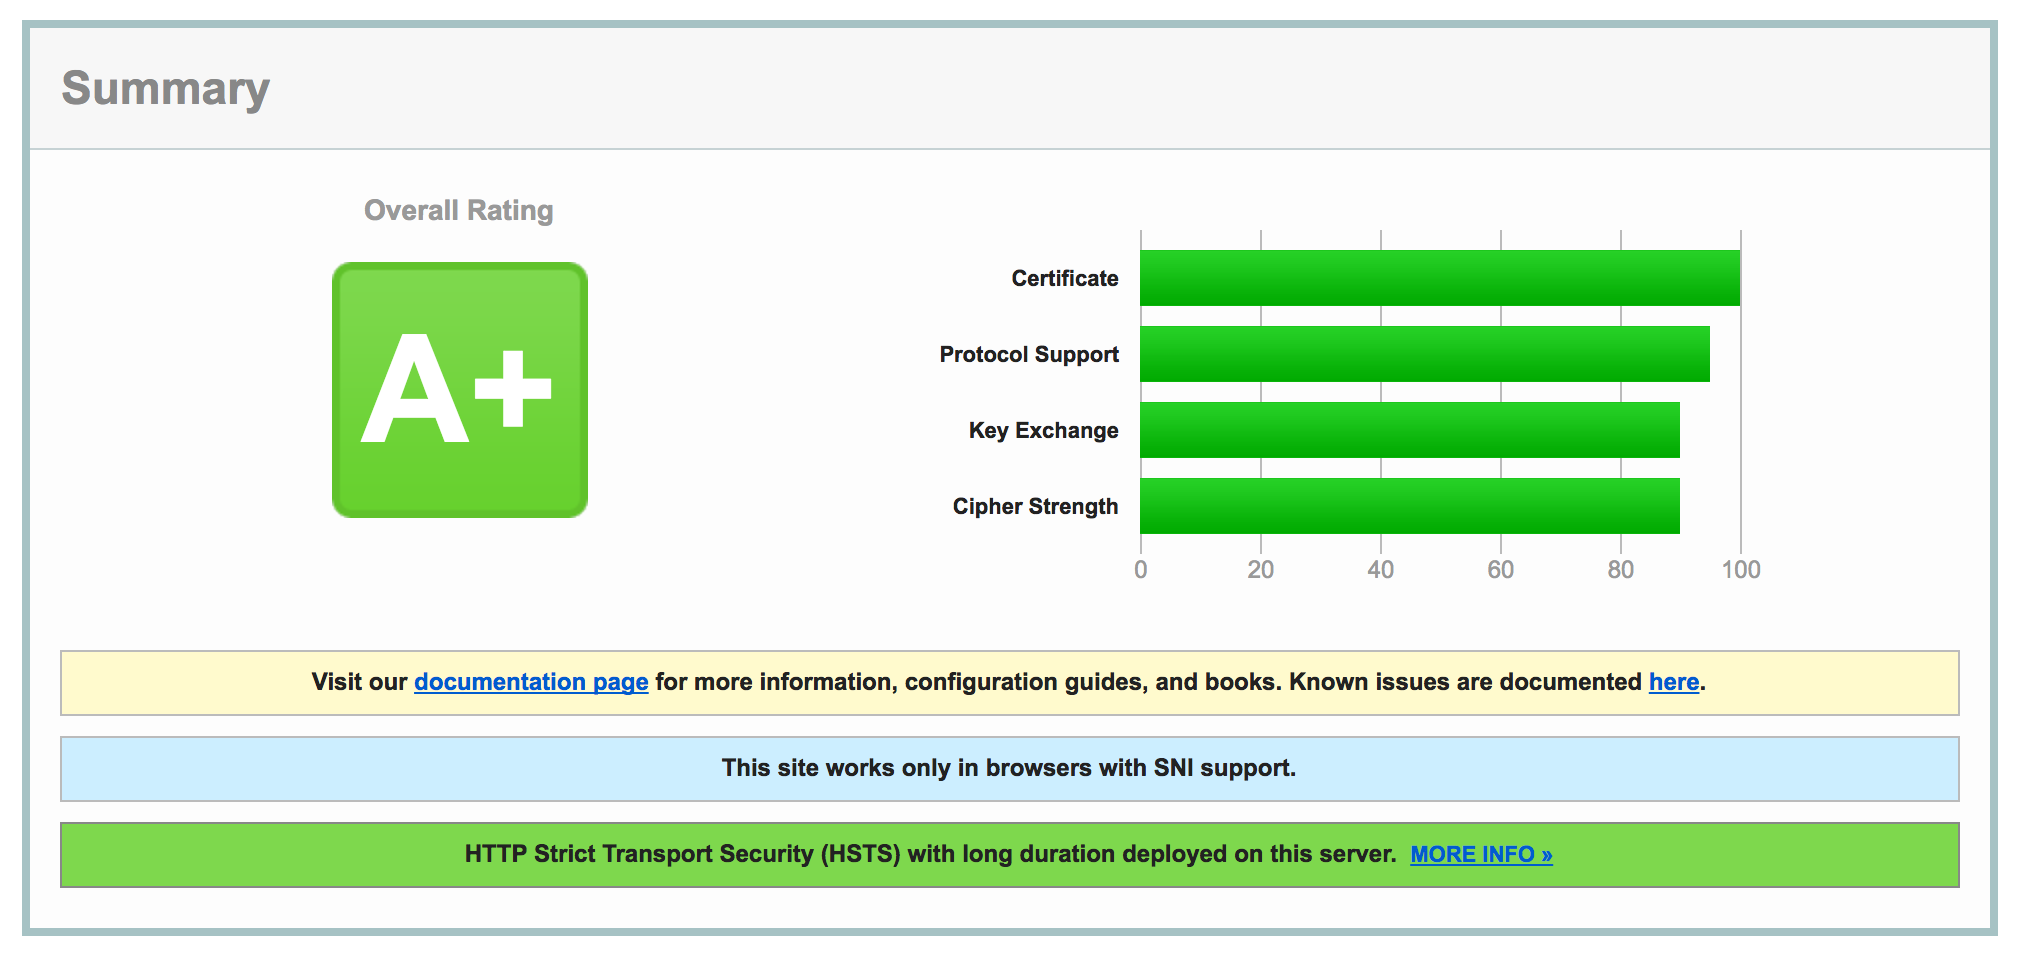
    Getting WordPress running properly on Apache with Nginx running as a reverse proxy is surprisingly difficult. It took me quite awhile to get all the moving parts in order, but it’s great once you get it all done. Plus, it’s really cool to get an A+ rating from SSL Labs:

    SSL Labs, russt.me A+ Rating

    Configuring Nginx for the Switch to HTTPS

    Luckily, I figured out the proper configuration to use for Nginx. It took me quite a bit of trial and error, but here’s a sample of the configuration you can use to facilitate your switch:

    server {
        listen 80;
    
        server_name example.com;
        server_tokens off;
    
        root /usr/share/httpd/example.com;
        index index.php index.html index.htm;
    
        location / {
            try_files $uri @apache;
        }
    
        location @apache {
            proxy_set_header X-Real-IP  $remote_addr;
            proxy_set_header X-Forwarded-For $remote_addr;
            proxy_set_header X-Forwarded-Proto $scheme;
            proxy_set_header Host $host;
            proxy_pass http://127.0.0.1:8081;
        }
    
        location ~[^?]*/$ {
            proxy_set_header X-Real-IP  $remote_addr;
            proxy_set_header X-Forwarded-For $remote_addr;
            proxy_set_header X-Forwarded-Proto $scheme;
            proxy_set_header Host $host;
            proxy_pass http://127.0.0.1:8081;
        }
    
        location ~ \.php$ {
            proxy_set_header X-Real-IP  $remote_addr;
            proxy_set_header X-Forwarded-For $remote_addr;
            proxy_set_header X-Forwarded-Proto $scheme;
            proxy_set_header Host $host;
            proxy_pass http://127.0.0.1:8081;
        }
    
        location ~/\. {
            deny all;
            access_log off;
            log_not_found off;
        }
    
        # We'll use this later
        # return 301 https://$server_name$request_uri;
    }
    
    server {
        listen 443 ssl;
    
        server_name example.com;
        server_tokens off;
    
        root /usr/share/httpd/example.com;
        index index.php index.html index.htm;
    
        ssl on;
        ssl_certificate /etc/letsencrypt/live/example.com/fullchain.pem;
        ssl_certificate_key /etc/letsencrypt/live/example.com/privkey.pem;
    
        # Ciphers recommended by Mozilla (wiki.mozilla.org/Security/Server_Side_TLS#Recommended_configurations)
        ssl_ciphers 'ECDHE-ECDSA-AES256-GCM-SHA384:ECDHE-RSA-AES256-GCM-SHA384:ECDHE-ECDSA-CHACHA20-POLY1305:ECDHE-RSA-CHACHA20-POLY1305:ECDHE-ECDSA-AES128-GCM-SHA256:ECDHE-RSA-AES128-GCM-SHA256:ECDHE-ECDSA-AES256-SHA384:ECDHE-RSA-AES256-SHA384:ECDHE-ECDSA-AES128-SHA256:ECDHE-RSA-AES128-SHA256';
        ssl_prefer_server_ciphers on;
        ssl_dhparam /usr/share/nginx/dhparams.pem;
    
        location / {
            try_files $uri @apache;
        }
    
        location @apache {
            proxy_set_header X-Real-IP  $remote_addr;
            proxy_set_header X-Forwarded-For $remote_addr;
            proxy_set_header X-Forwarded-Proto $scheme;
            proxy_set_header Host $host;
            proxy_pass http://127.0.0.1:8081;
        }
    
        location ~[^?]*/$ {
            proxy_set_header X-Real-IP  $remote_addr;
            proxy_set_header X-Forwarded-For $remote_addr;
            proxy_set_header X-Forwarded-Proto $scheme;
            proxy_set_header Host $host;
            proxy_pass http://127.0.0.1:8081;
        }
    
        location ~ \.php$ {
            proxy_set_header X-Real-IP  $remote_addr;
            proxy_set_header X-Forwarded-For $remote_addr;
            proxy_set_header X-Forwarded-Proto $scheme;
            proxy_set_header Host $host;
            proxy_pass http://127.0.0.1:8081;
        }
    
        location ~/\. {
            deny all;
            access_log off;
            log_not_found off;
        }
    }
    

    Now for some explanation of what’s going on in that configuration file. First, we catch any unsecured traffic – that’s the directive that says listen 80. This part is just a temporary provision to allow us to accept both HTTP and HTTPS traffic while we’re getting things set up. Later on, we’ll adjust the config to redirect all the HTTP traffic to HTTPS, forcing secured connections. For now, though, you’ll notice that the first server block for http and the second server block for https contain large blocks that are identical – that’s because for now they do pretty much the same thing – just one with encryption and one without.

    In our second server block, we actually configure the stuff that matters. First, we enable ssl and tell nginx where to find the TLS certificates. Next, we configure the ciphers that we’ll allow on this site. These specific ciphers are recommended by Mozilla for ‘modern’ compatibility. If you need to support older stuff, you’ll have to investigate allowing less secure ciphers.

    After that, we have several location blocks that tell nginx what to do with different requests. The first and second rules tell nginx to check for a matching file (that’s the try_files). If it finds a file, like an image, CSS, JS, etc., nginx will serve that file directly. If there isn’t a matching file, it passes it to @apache, which is defined in the next rule. Nginx is faster at serving raw files than Apache, so we want it serving files where possible.

    The next two location rules tell nginx to pass any requests for .php files or requests ending in / to apache, as well. We pass these to apache because it’s faster at handling php requests. In these cases, I’ve got Apache running locally on port 8081. We need to forward the headers and request host to Apache to make sure that Apache still knows what to do to handle the requests properly.

    Finally, the last location rule tells nginx to deny access to any files beginning in ., which are hidden files that really shouldn’t be shown to the public.

    With a quick restart of nginx, your new configuration should take effect.

    Configuring Apache

    Luckily, as far as configuration goes, nginx does most of the heavy lifting. It only forwards the appropriate requests to Apache, so our Apache configuration is pretty straightforward. Of course, the most important thing that you need to do is tell Apache to listen on a different port than nginx. By default, both nginx and Apache listen on port 80. I decided to tell Apache to listen on port 8081 by specifying that in my httpd.conf file – by changing the Listen line to Listen 8081.

    To configure my site, I simply used the following:

    <VirtualHost *:8081>
        ServerName example.com
    
        DocumentRoot /usr/share/httpd/example.com
    
        <Directory />
            Options FollowSymLinks
            AllowOverride None
        </Directory>
    
        <Directory /usr/share/httpd/example.com>
            Options Indexes FollowSymLinks MultiViews
            AllowOverride All
            Order allow,deny
            allow from all
            Require all granted
        </Directory>
    </VirtualHost>
    

    It’s a pretty simple configuration – just telling Apache what to listen to and where to find the applicable files. And that does it for our web server configuration! Finally, we just need to tell WordPress that it needs to just use https.

    Configuring WordPress

    You see, the primary difficulty with the WordPress portion of things lies in the fact that WordPress normally assumes it’s running on Apache, with no proxy set up.

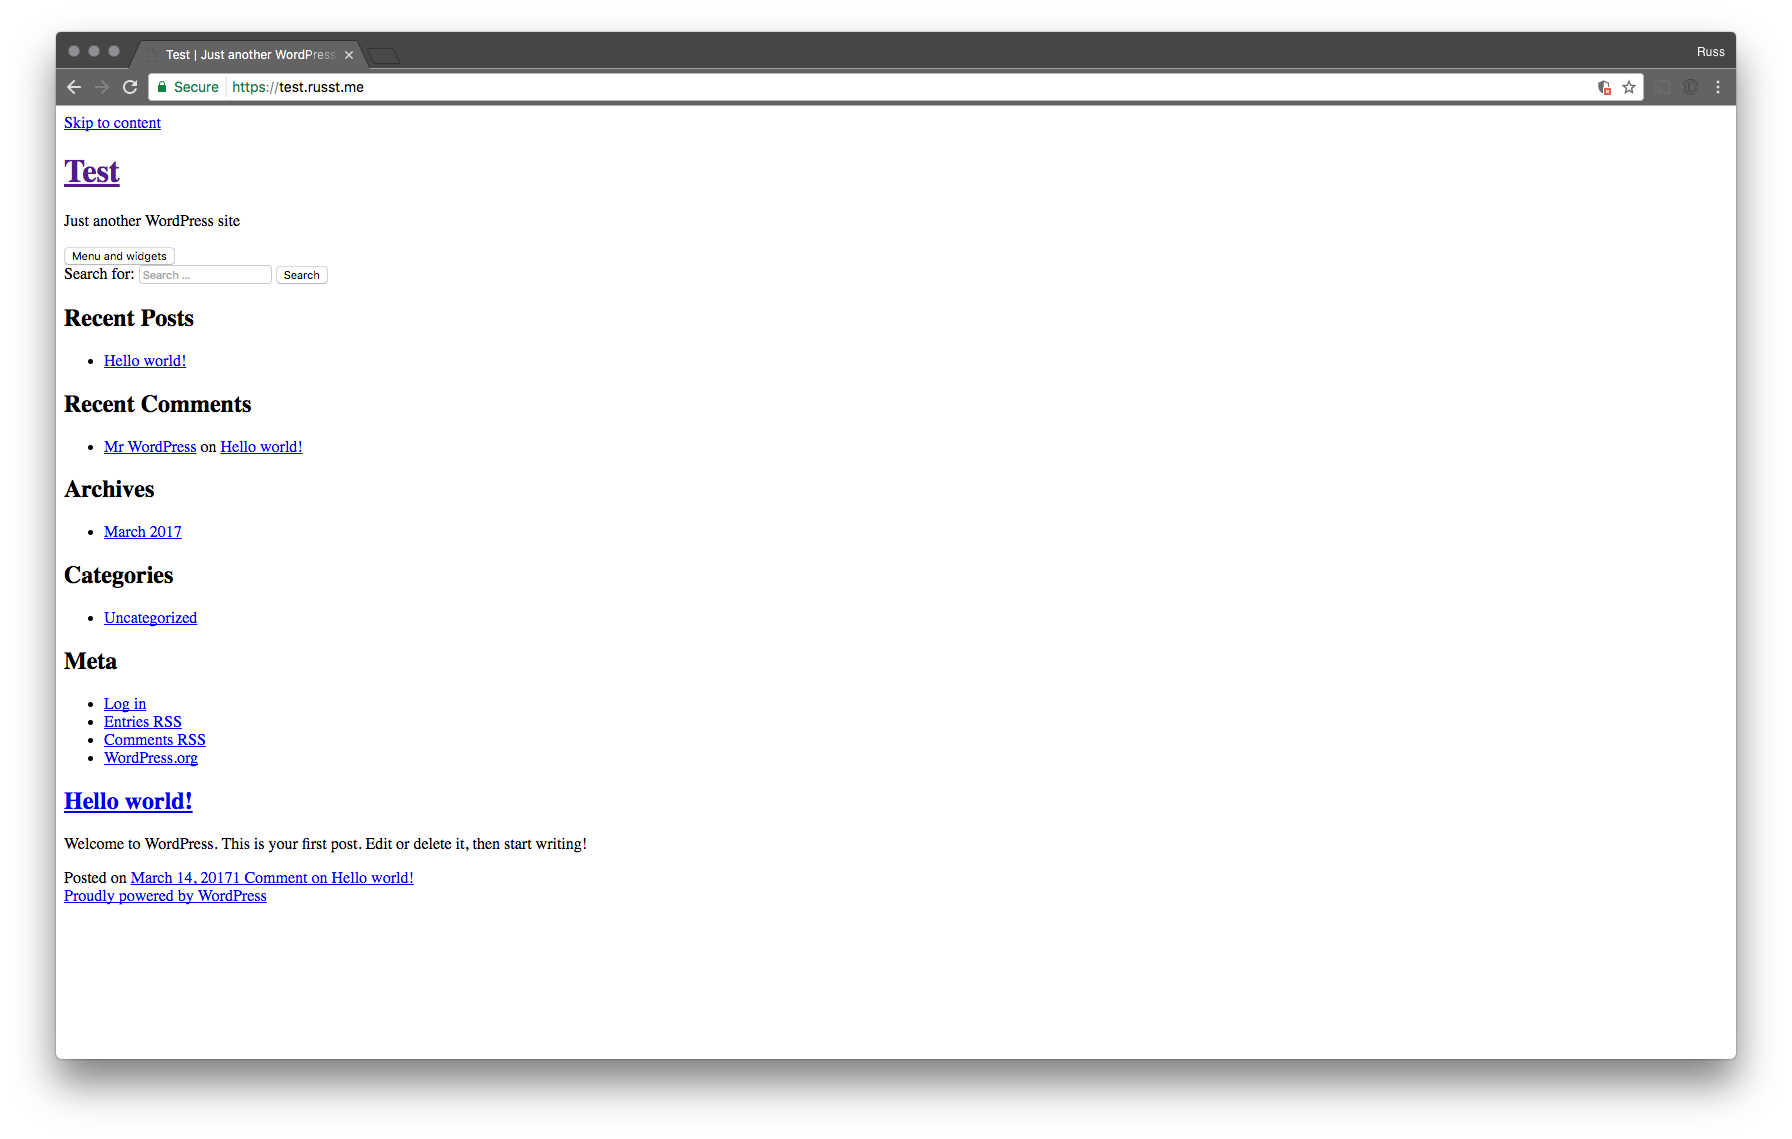
    Now, if you set up a redirect from http to https for your site before you set your site URL to https, your site wouldn’t be able to load any of your assets (unless you enable mixed-content). It makes your site look awesome:

    SSL Enabled, no Assets

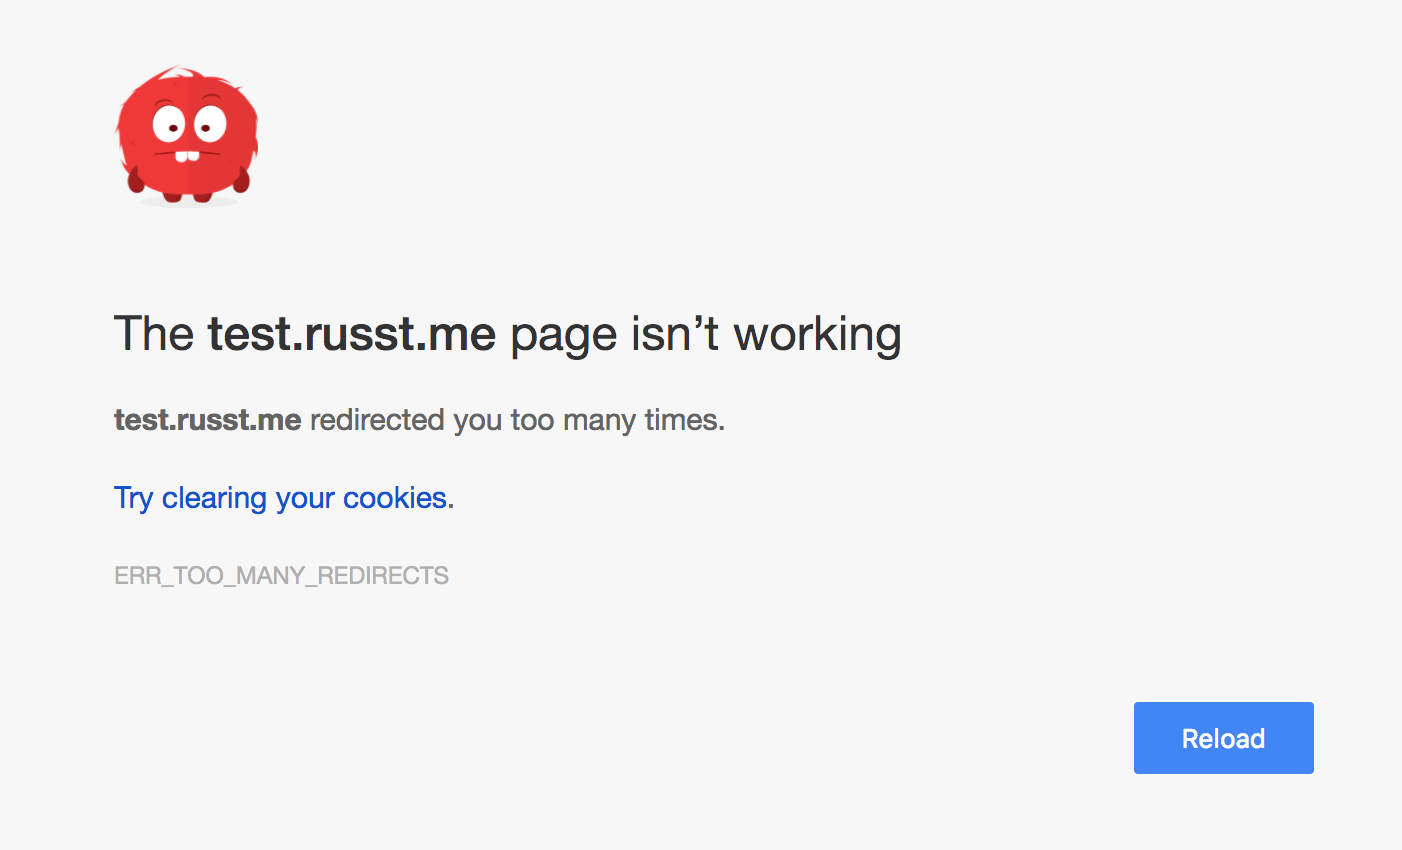
    What’s better is that if you tried to access your control panel, you would end up stuck in a redirect loop, endlessly going from HTTP to HTTPS and back. It results in your browser showing something like this:

    ERR_TOO_MANY_REDIRECTS

    But since you’ve got your web servers configured to temporarily allow http, this is a pretty easy fix. First, log in to your control panel. There, you’re going to need to access ‘Settings ▶ General’. Finally, update both your ‘WordPress Address’ and ‘Site Address’ to use https instead of http.

    Next, we need to configure a couple of settings in our WordPress installation’s config.php file. These are pretty simple, and the process is outlined in the WordPress documentation. We need to add the following lines to config:

    define('FORCE_SSL_ADMIN', true);
    if (strpos($_SERVER['HTTP_X_FORWARDED_PROTO'], 'https') !== false)
        $_SERVER['HTTPS']='on';
    

    These lines tell WordPress that we want to use the control panel over HTTPS. If we leave these out, we end up in the endless redirect loop I mentioned up above. Now, you’re ready to force all your traffic to use HTTPS.

    Update Site Addresses

    Force Encryption

    Finally, we’ve got to make the final adjustment to our config, that will force all traffic over HTTPS. It’s really straightforward – just change the first server block in your nginx config file to something like this:

    server {
        listen 80;
    
        server_name example.com;
        server_tokens off;
    
        return 301 https://$server_name$request_uri;
    }
    

    All this does is return a 301 Status Code, telling users’ browsers that an address has moved permanently – all major browsers will automatically redirect them to the exact same address, but using https instead. It’s a simple way to force traffic to use https.

    With one final restart of nginx, you’re good to go! All your wordpress traffic will be set up to use https.

  • Open Wi-Fi & Wireless Security

    Open Wi-Fi & Wireless Security

    I’ve recently been thinking about Wireless Security, and the way it relates to ‘public access points’. It seems to me that it’s very difficult for us to avoid public networks altogether (whether we’re at a hotel, a coffee shop, or really anywhere else). Sometimes, we really need to connect, even if we have some burning desire to avoid all public networks.

    I’ve seen all sorts of recommendations on how to ‘solve’ this, usually involving ‘securing’ the network with encryption. This sounds good, since some encryption is better than none, right? Even if you make the password public, by writing it on the wall or putting it in the network’s name, you’re still ‘securing’ the network, right?

    Unfortunately, even for ‘secure’ Wi-Fi, we’re most often still using what’s called a PSK (a Pre-Shared Key). The problem is, it’s just that – it’s a key that everyone using the network shares. That means that the guy in the corner on the same network, even though you’re both using ‘secure’ Wi-Fi, can still decrypt everything you send. PSK’s provide no additional security over an open network, except that the attacker at least has to know that key.

    The only exception to this is WPA-Enterprise, which is normally used as just that, an enterprise connection. It requires quite a bit of setup, and it’s far too painful for most of us to mess with. Not only that, but it really makes it difficult to have an ‘open’ network.

    So, with all that said, what can we actually do to be secure on public Wi-Fi? Truthfully, the best thing we can actually do right now is use HTTPS everywhere. While it’s been trivial to create a secure connection between two individuals for quite some time, the difficulty lies in verifying that the person/system that you’re connecting to is in fact who they say they are, and not some Man in the Middle.

    With HTTPS, this is handled through the creation and verification of SSL certificates by Certificate Authorities, who verify the ownership of certain keys, so that you can be sure that when you go to https://google.com, you’re actually communicating with Google, not someone else.

    But with wireless networks, this would be much harder. Short of requiring every public network owner to submit themselves to some method of verification that was then publicly shared with everyone, it’s actually impossible to do so.

    Truthfully, I wish I had something better to say. But unfortunately, the best course of action for public networks is to get every website to use HTTPS – even though it doesn’t protect everything, it’s the best we’ve got. So get out there and get your certificates!

    Of course, you can always use a VPN, which will give you better security, at the expense of some speed and whatever subscription cost you have.

  • HTTPS for free with Let’s Encrypt

    HTTPS for free with Let’s Encrypt

    If you’re anything like me, you’ve probably wanted to add HTTPS to your personal sites or apps, without having to shell out the money to get a certificate from a certificate authority. Of course, self-signed certificates were always an option, but it really kind of sucked to have to always either bypass warnings or install the certificate everywhere. Oh, that and the fact that my Android phone would warn me every time I booted that someone could be eavesdropping on me.

    For that reason, I haven’t ever used an SSL certificate on my sites, except for the occasional self-signed cert. Luckily, finally, Let’s Encrypt has come along to save the day (well, they’ve just entered public beta). They’re an automated and free certificate authority, and they make getting a certificate a breeze. Heck, if you have a matching configuration, the whole process is already automated.

    Installing Let’s Encrypt

    Installation is super easy – the official (and almost assuredly up-to-date) instructions can be found on the Let’s Encrypt website, but it’s definitely quite simple. In most cases, the easiest method is to clone the letsencrypt repository from github:

    git clone https://github.com/letsencrypt/letsencrypt
    cd letsencrypt
    

    You can see if it’s available via your distro’s package manager and install it that way, too. I haven’t found it in either yum or apt-get yet, so your mileage may vary.

    Getting a certificate

    If you happen to be running a supported configuration (as of right now, just Apache running on Debian or Ubuntu), then you can let it take care of all the dirty work for you: ./letsencrypt-auto --apache (though probably with sudo). That should take care of everything for you. I haven’t tried it personally, but I’d imagine it’s pretty sweet. If you try it and it works, then you can feel free to skip the rest of this article, because it probably won’t help you much.

    Otherwise, you’ll want to go the certonly route to obtain your certificates. It’s still super easy, and the configuration itself isn’t super difficult.

    To obtain your certificate, first ensure that your DNS A record is pointing to the correct server. If you don’t, well, then this certainly isn’t going to work.

    Webserver Considerations

    In order for Let’s Encrypt to verify that the DNS record in fact points to the server that you’re using, it needs to temporarily place a file in your webroot. This allows it to prove that you really do have control over the DNS records for that domain. You can do this one of two ways:

    1. By specifying the --webroot flag when you run letsencrypt
    2. By temporarily stopping your web server so that letsencrypt can spin up its own

    Depending on your site’s configuration, one may be easier (or less disruptive) than the other. In my case, the servers I’ve configured thus far haven’t had an easily accessible webroot, so I just shutdown my webserver (sudo systemctl stop nginx.service in my case, on CentOS 7) while I obtained the certificate.

    Get Your Certificate

    Once you’ve taken care of that, run ./letsencrypt-auto certonly -d example.com to obtain a certificate for your domain. Or, if you’re using the webroot flag, execute ./letsencrypt-auto certonly --webroot -w /var/www/example / -d example.com without shutting down your webserver. For more details, see the ‘How it works’ page on Let’s Encrypt’s site.

    Your certificate files will be placed in /etc/letsencrypt/live/example.com/ (naturally, replacing example.com with your address).

    Configuring your webserver

    I’ve gradually been configuring a new server with Ansible (which is a whole story in itself), and in the process, I’ve switched over to using Nginx as the primary web server with a reverse proxy setup to direct other requests where necessary. As a result, my direct experience with Let’s Encrypt is limited to Nginx, but I know it’s similar with Apache or whatever else you might be using.

    For me, setting up https for my sites just involved the following:

    1. Adding a redirect from the insecure HTTP site to the HTTPS site
    2. Adding a second directive in the server configuration for port 443
    3. Enabling SSL on that configuration
    4. Specifying the location of the certificate files

    In Nginx, the redirect looks like this:

    server {
        listen 0.0.0.0:80;
        server_name example.com;
        server_tokens off;
        return 301 https://$server_name$request_uri;
    }
    

    This tells Nginx to listen on port 80 for requests to example.com, then return a 301 code saying that the requested resource has moved permanently to the same address, but with https:// instead of http://.

    In similar fashion, configuring the SSL portion of the site is quite simple, and goes something like this:

    server {
        listen 0.0.0.0:443 ssl;
    
        server_name example.com;
        server_tokens off;
    
        ssl on;
        ssl_certificate /etc/letsencrypt/live/example.com/cert.pem;
        ssl_certificate_key /etc/letsencrypt/live/example.com/privkey.pem;
    
        root /var/www/example;
    }
    

    If you’re using Apache, you’ll probably need to use another one of the certificate files, but I’m not entirely sure which at this point. However, if you need more info about that, I’d recommend checking out Apache’s documentation on SSL.

    Final Notes

    There are a few more considerations with these certificates. Though they’re supported by all major browsers, which is awesome, there are a few places that are lacking – for example, I’ve noticed that GitHub’s web hooks don’t realize that the certificates are valid. It seems like this might be something related to OpenSSL, but I haven’t had time to investigate it yet.

    Also, these certificates expire after 90 days, so they need to be refreshed fairly often. However, since obtaining the certificates is so easy and it’d be super easy to script, it’s something that you could easily add as a cron job. It’s what I’m planning to do in the near future.

    Hopefully this was helpful. Feel free to chime in if you’ve got any questions or comments!